Menu déroulant pour mobile

Category : Data Center

Cisco Meraki vMX 100 deployment in Azure

Generalities

There are many ways to connect your “on Premises” Data Center workloads with Microsoft Azure. I own the full meraki suite at home and have enjoyed it for the past three years. It provides all the features I need. I also have some workloads in Microsoft Azure and wanted to access them using a private and encrypted network instead of accessing them using their public IP. Meraki have the possibility to deploy a vMX 100 in Microsoft Azure. You can deploy a vMX100 either in Azure or in AWS and it will be part of your full mesh VPN as any other MX device that you own.

It can support up to 500 Mbps of VPN throughput which can be sufficient for a lot of organizations. From a licensing standpoint, you just need a Meraki License : LIC-VMX100-1YR (1 Year), LIC-VMX100-3YR (3 Years), LIC-VMX100-5YR (5 years). Microsoft will charge you monthly for the VM application.

From a design standpoint, the traditionnal Meraki MX appliances can be configured either in VPN concentrator or in NAT mode. The NAT mode concentrator has 2 interfaces (upstream and downstream) and performs Network Address Translation as you would do with a traditionnal firewall. In the concentrator mode the MX has a single interface connection to the upstream network. This mode is the only supported mode for the vMX100 in Microsoft Azure

Limitations

When you deploy the vMX 100 in your Azure and Meraki infrastructure for the first time, it works pretty well and the vMX 100 is able to fetch its configuration pretty quickly. If you delete all the objects and start from scratch, this will trigger a bug that is being identified by Meraki. Although I don’t have the technical details, the Meraki TAC will manually apply a fix that will trigger a synchronisation between the Meraki cloud and the vMX 100 in Microsoft Azure.

Logical Diagram

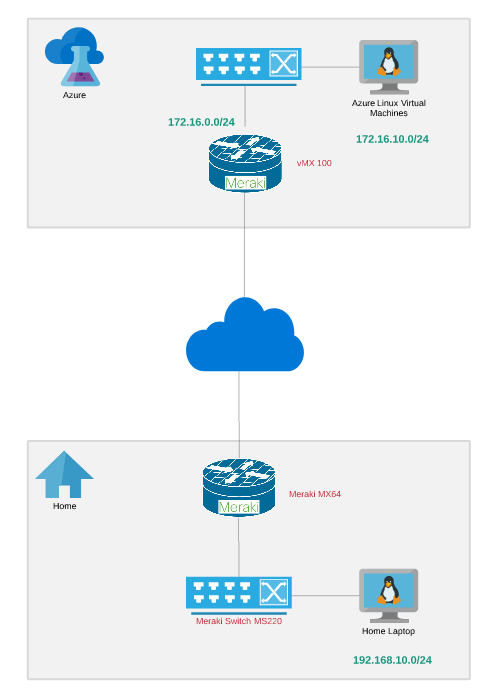
The below diagram is not 100% accurate based on the fact that the vMX100 supports only the one arm VPN concentrator mode. From a logical standpoint it represents a general good idea of what we are trying to achieve here. The Home internal network would use 192.168.10.0/24, the servers in Azure would use 172.16.10.0/24 and the vMX100 would use 172.16.0.0/24 with a single interface both for the downstream and upstream traffic. We will see how can we interconnect the Azure Linux virtual machines with the Meraki vMX 100 single arm VPN concentrator in details.
Initial Setup – Meraki

Initially, you would need to install the vMX100 license received from Cisco to the Meraki Dashboard.
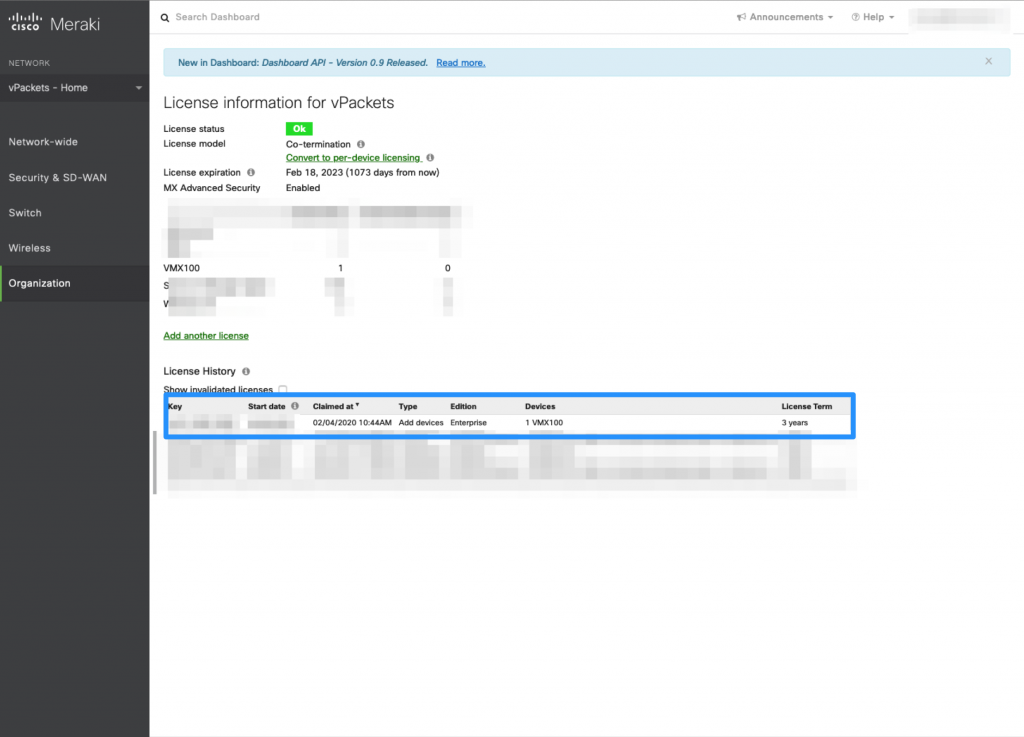
Cisco Meraki Dashboard – Licensing – Adding the vMX100

When the vMX100 license is installed, we can claim that device. We will do that in a new network. It is important that the network type is setup as “Security appliance” with a default configuration.
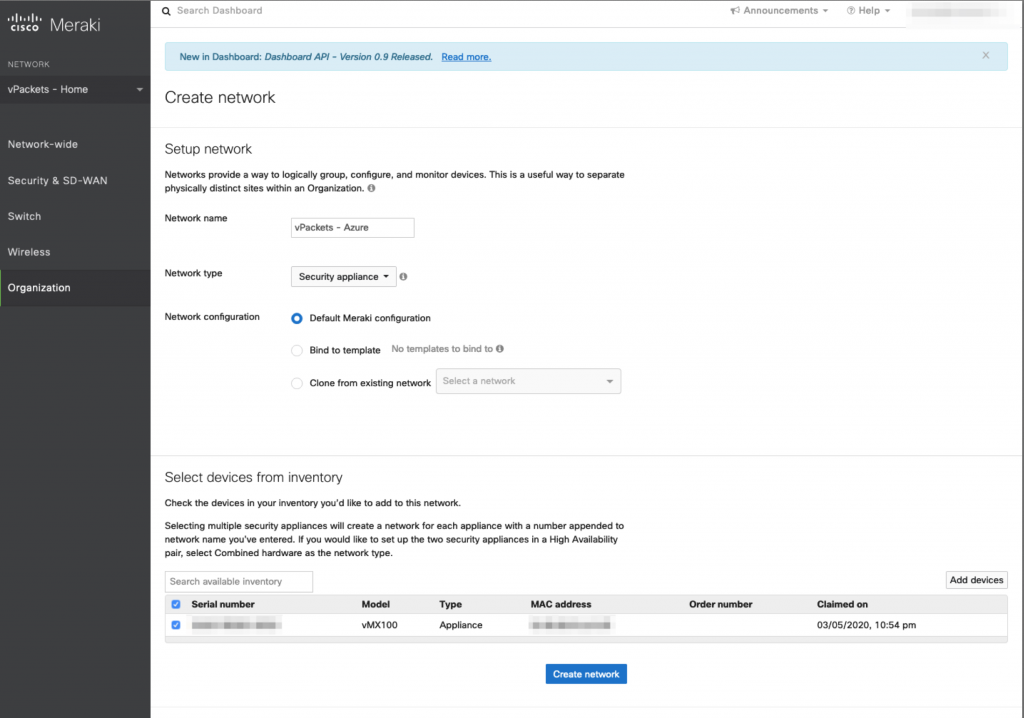
Cisco Meraki Dashboard – Adding a new network

We can now see that the appliance is ready in the Meraki Dashboard and that it will come with a basic configuration. It is now time to deploy the vMX in Azure.
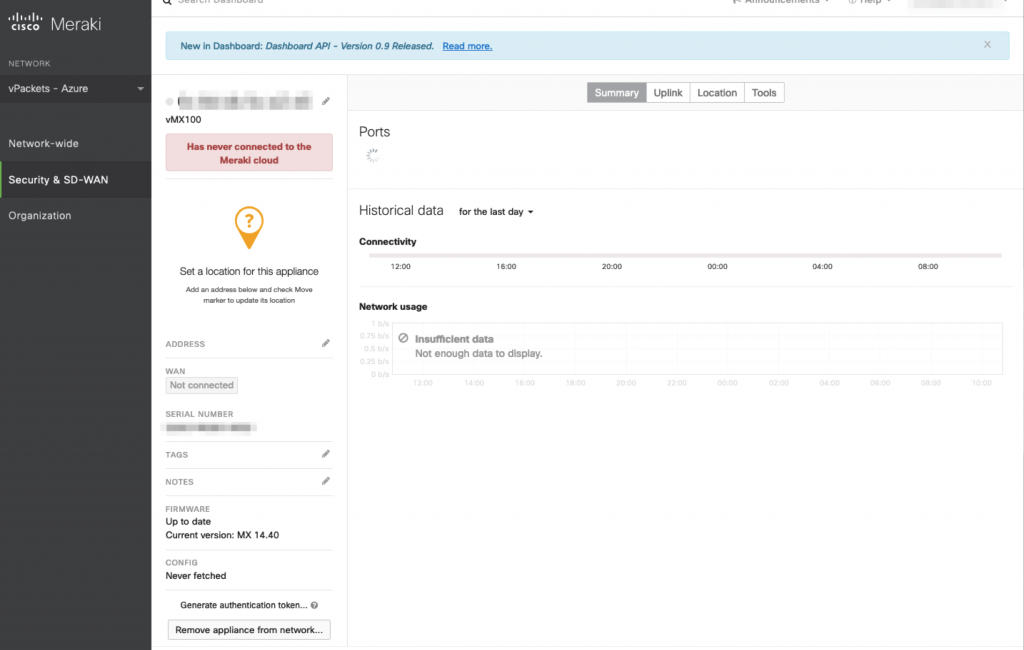
Cisco Meraki Dashboard – Appliance

Initial Setup – Microsoft Azure

As you can see in the screenshot below, our Azure infrastructure is empty and we will configure it so that it can host the vMX100 and some servers.
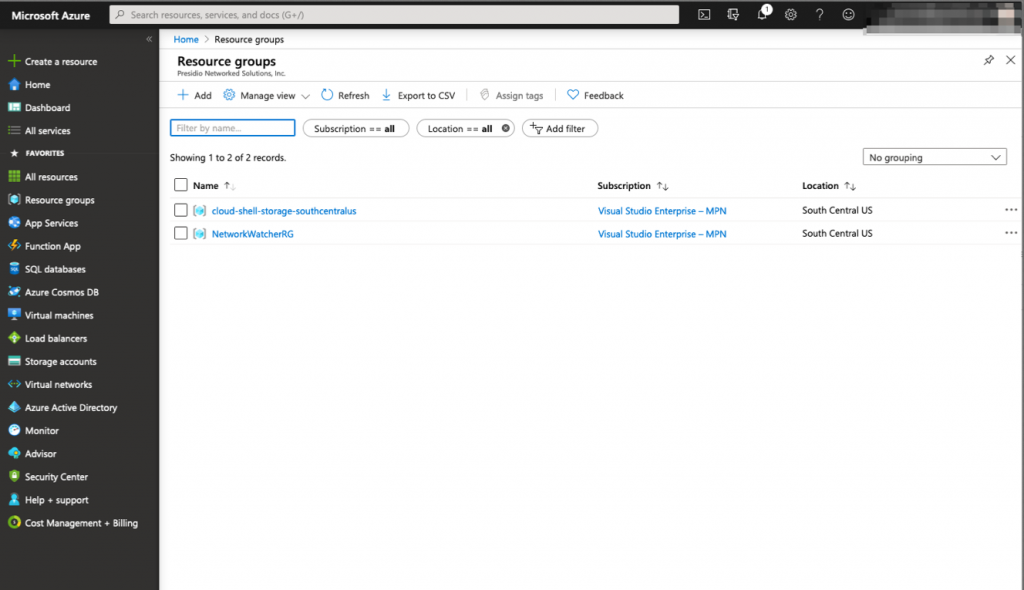
Azure – Resource Group initial

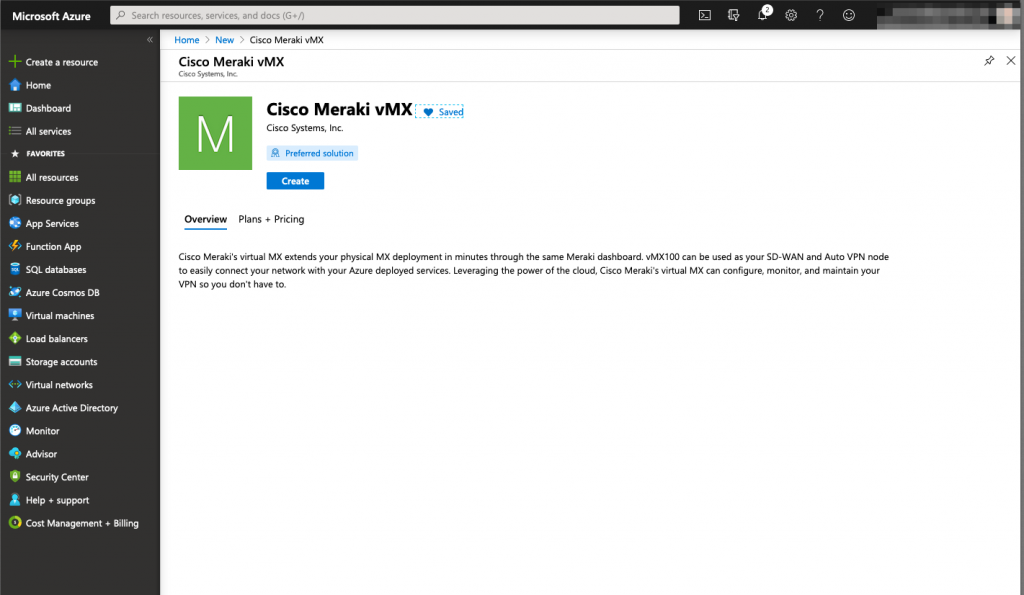
The Cisco Meraki vMX100 is available publicly on the Azure public catalogs as a managed application. It means that when you deploy the vMX100, a dedicated resource group will be created specifically for that service. That resource group will host every crucial component of the solution (Virtual Machine – Storage – Networking)

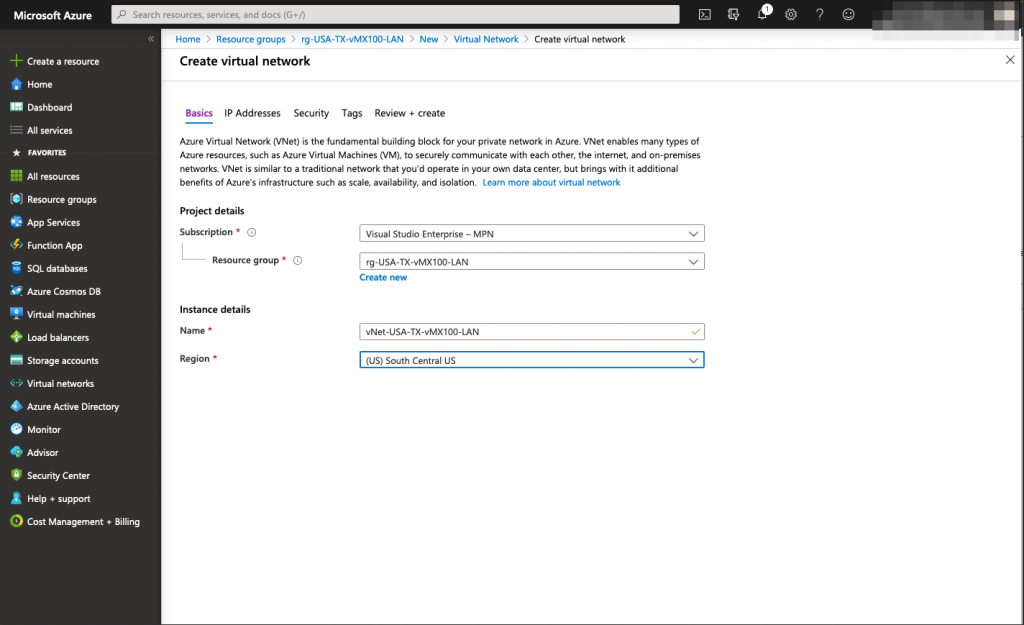
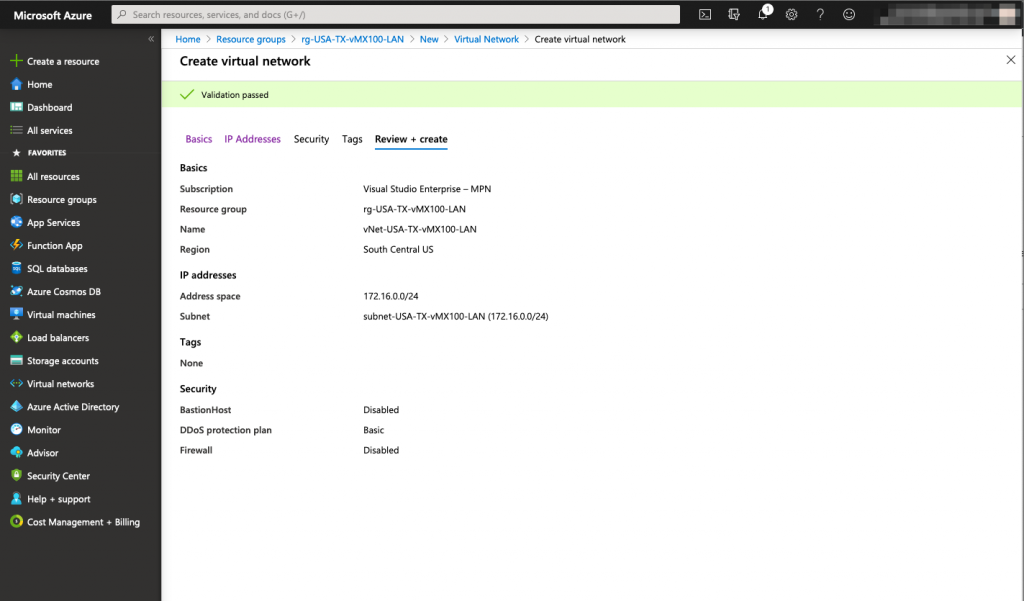
First we will create a dedicated resource group and virtual network for the vMX Network Interface (172.16.0.0/24)
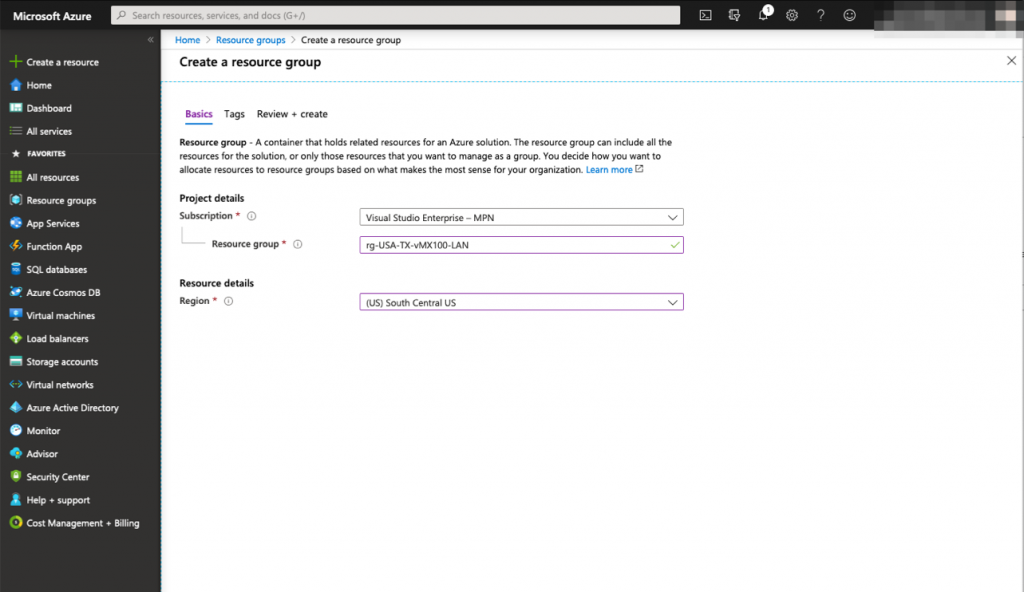
Azure – Resource group

Once the resource group for the vMX interface is created, we need to create a Virtual Network (vNET) for it.
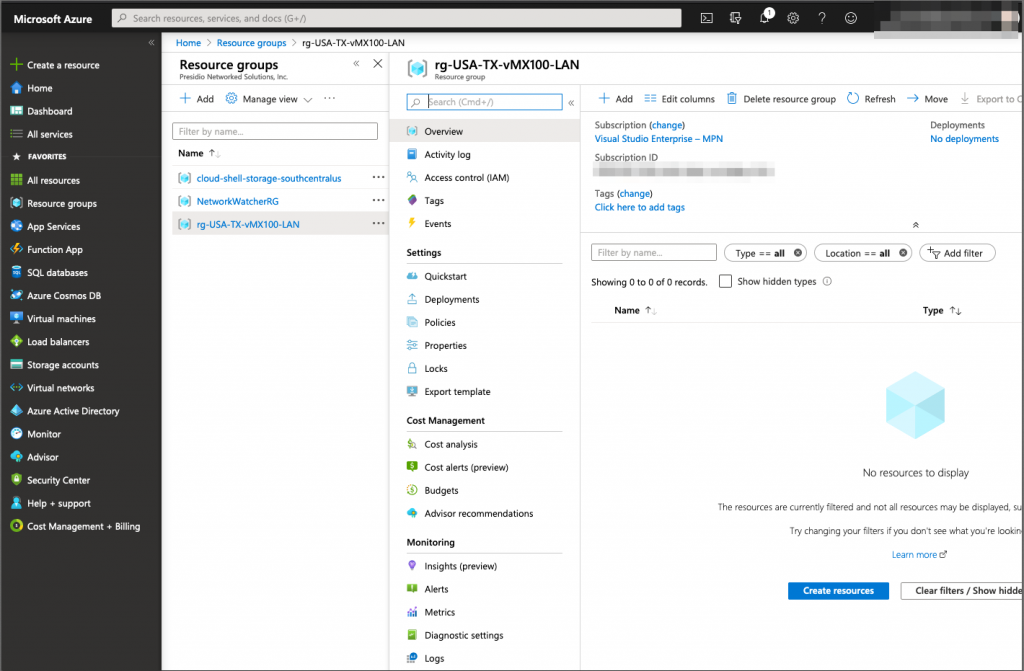
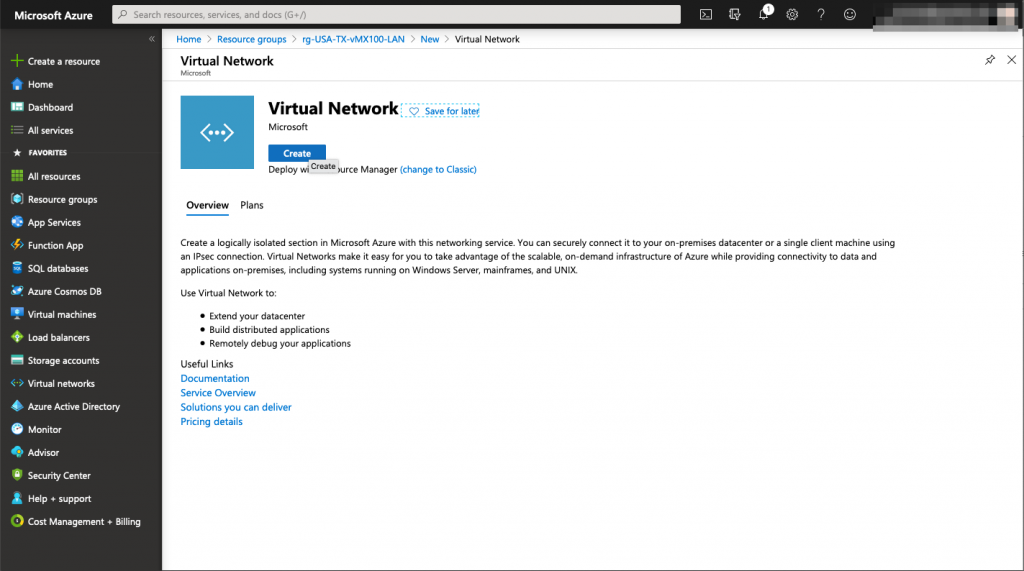
Azure – vNet Meraki LAN creation – Step 1

Azure – vNet Meraki LAN creation – Step 2
Azure – vNet Meraki LAN creation – Step 3

In this step, make sure you specify the right subnet for your Meraki vMX interface, it will be assigned automatically to the vMX when it will be deployed. In our example, the Meraki interface will use an IP address in the 172.16.0.0/24 range.
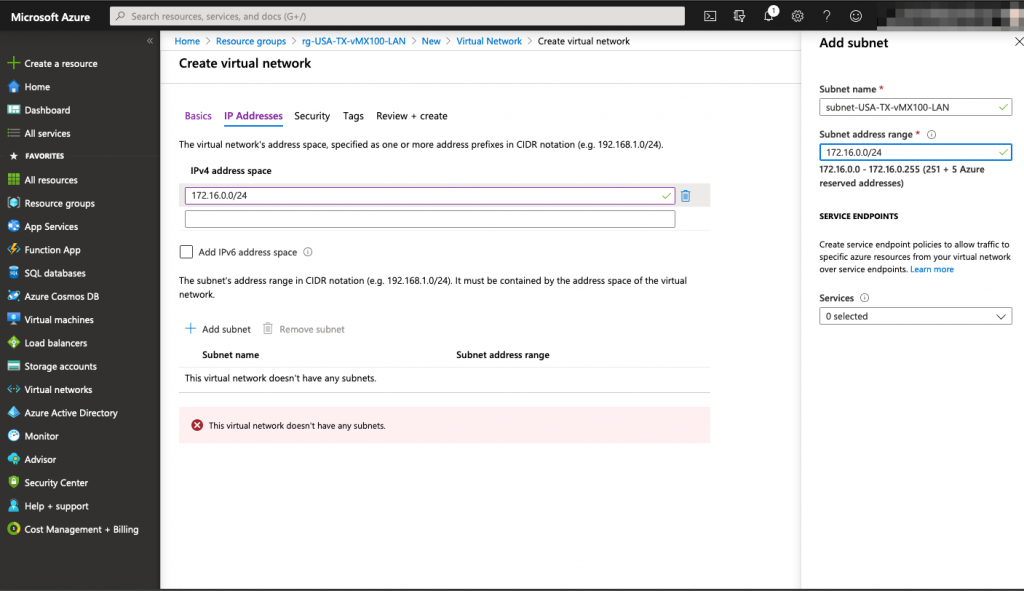
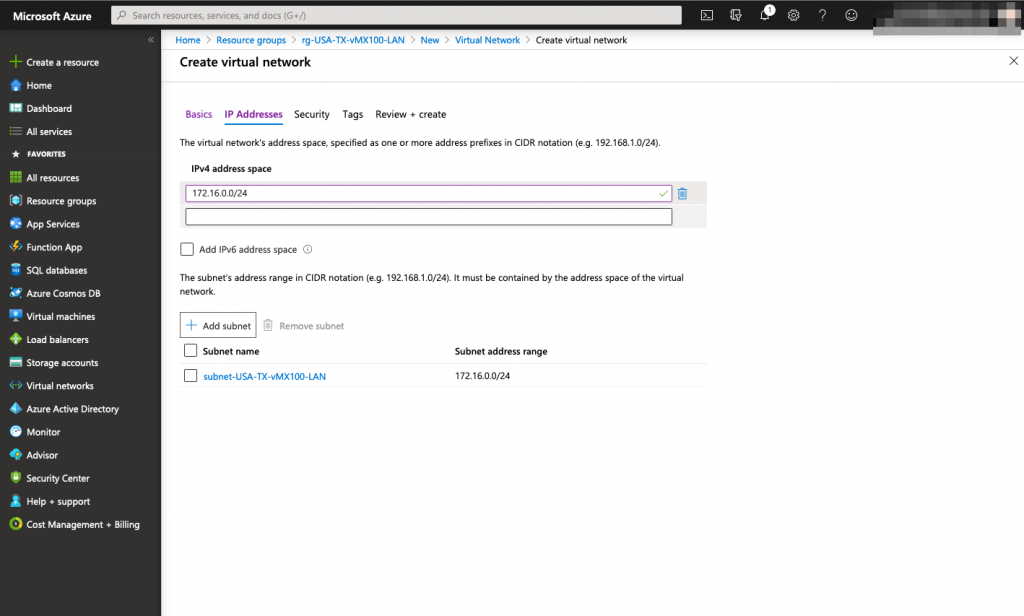
Azure – vNet Meraki LAN creation – Step 4
Azure – vNet Meraki LAN creation – Step 5
Azure – vNet Meraki LAN creation – Step 6

When the resource group and virtual network are created, we are ready to install our vMX 100 appliance in Microsoft azure.

This is what we have created so far.
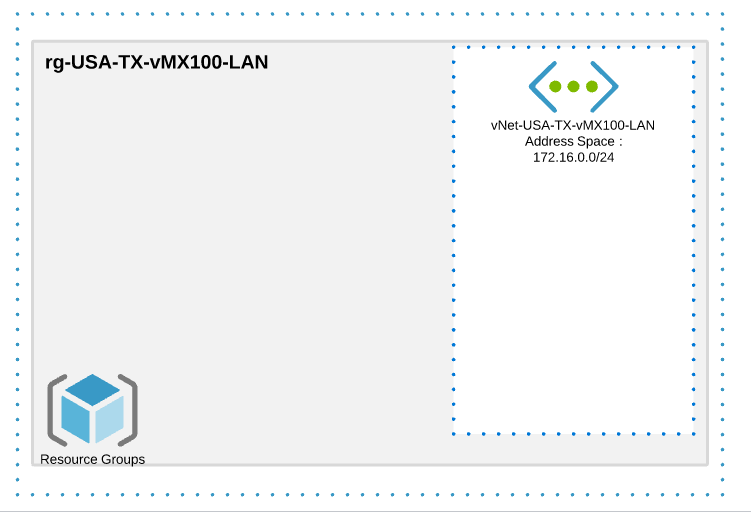
vMX100 deployment in Microsoft Azure

We are now ready to deploy our vMX 100 in Microsoft Azure as a managed application. A token must be generated from the Meraki dashboard in order to identify your tenant when you deploy the vMX 100. When you generate the vMX100 token, you have 1 hour to deploy the virtual machine in Azure or the token will no longer be valid.
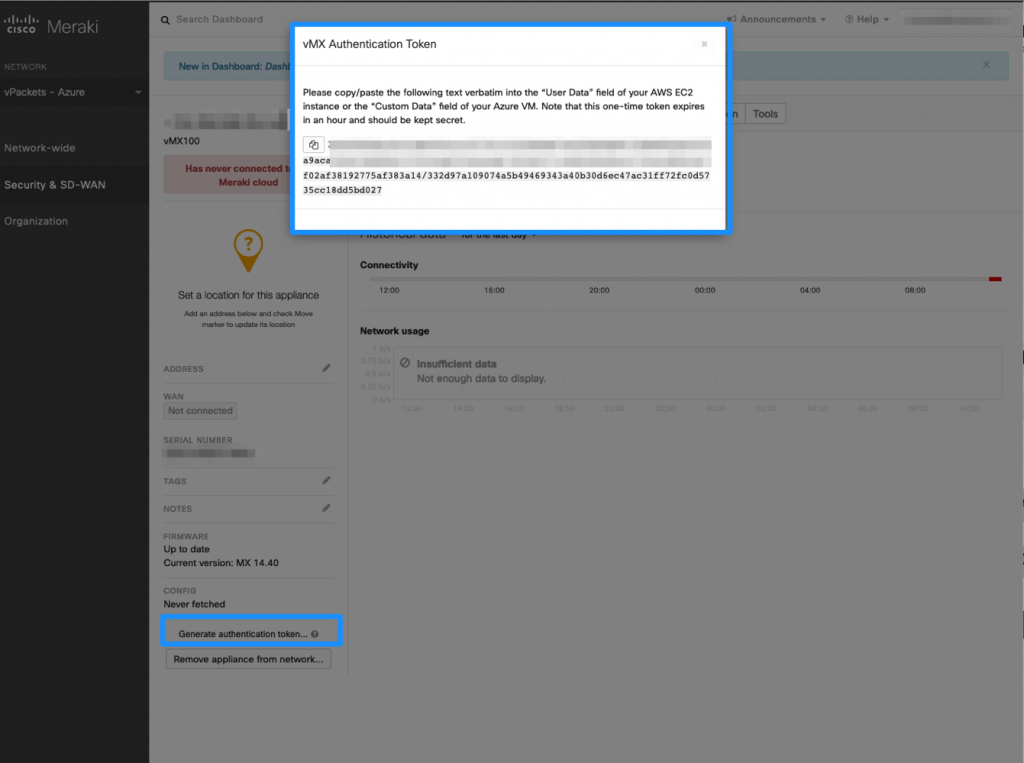
Meraki Azure – vMX100 Token
Meraki Azure – vMX100 Deployment 1

When it comes to configuring the basic settings of the vMX100, you will need to enter the Meraki Token that has been generated previously (reminder: This token has a lifetime of 1 hour). the resource group needed for the vMX 100 needs to be NEW and empty, you cannot reuse the previously created resource group for the Meraki interface. The reason behind is that vMX100 will be a managed applications and require its own resource group.
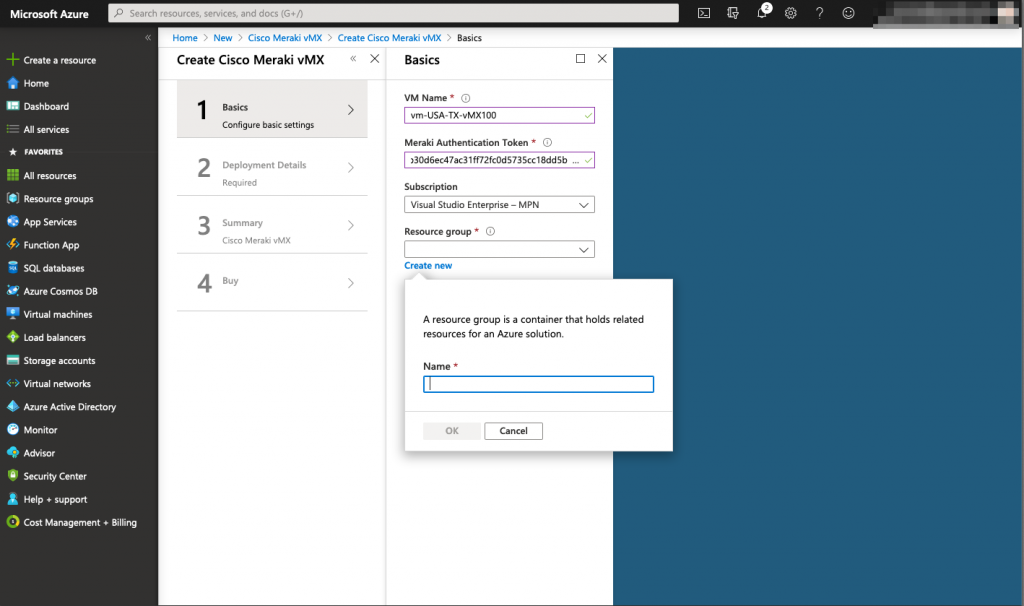
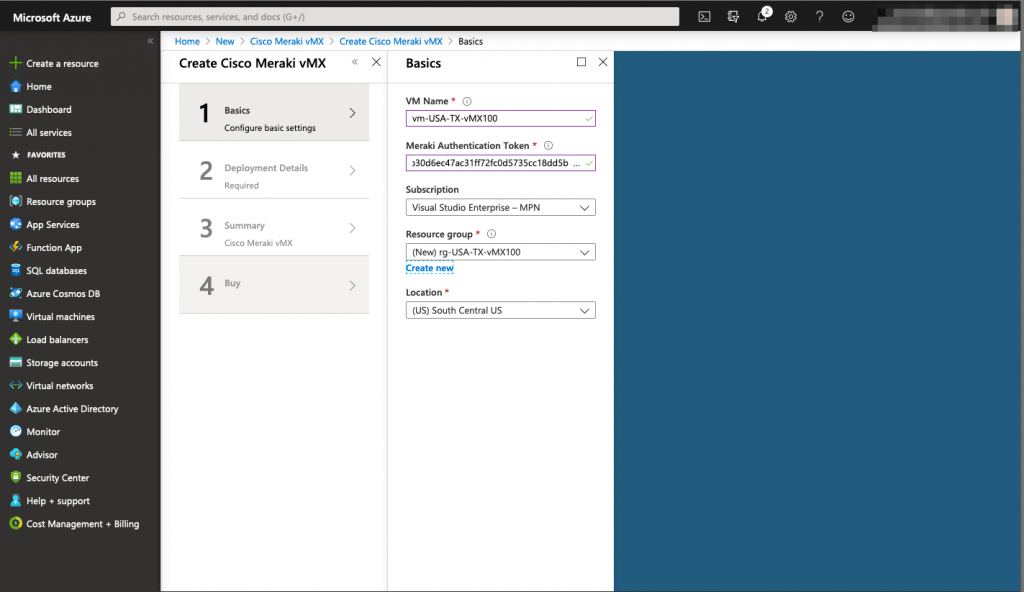
Meraki Azure – vMX100 Deployment 2
Meraki Azure – vMX100 Deployment 3

After that, you need to map the right vNet and subnet for the virtual machines. Here, you will reuse the previously created objects:
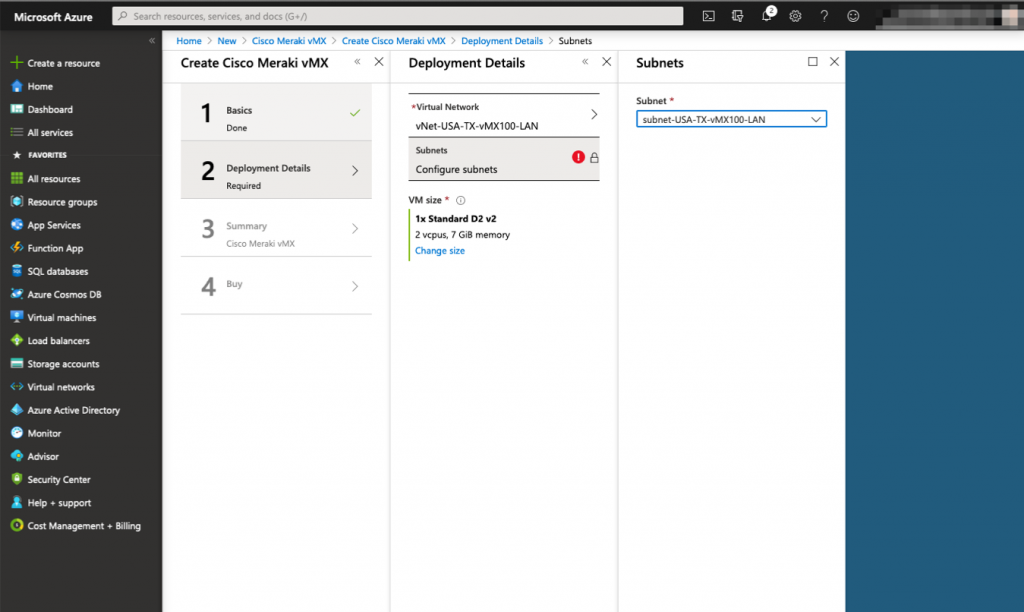
Meraki Azure – vMX100 Deployment 4

Next, you specify the size of the virtual machine you need. Meraki doesn’t specify if there is a different performance specifcations for each size so I went with the cheapest.
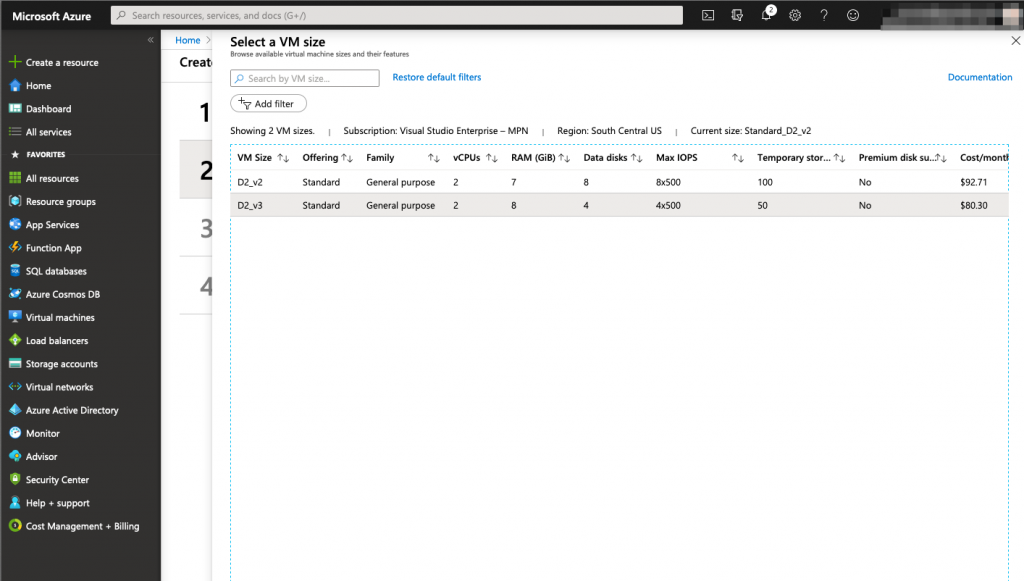
Meraki Azure – vMX100 Deployment 5

Once everything is setup, finish the process by buying the vMX100 subscription.
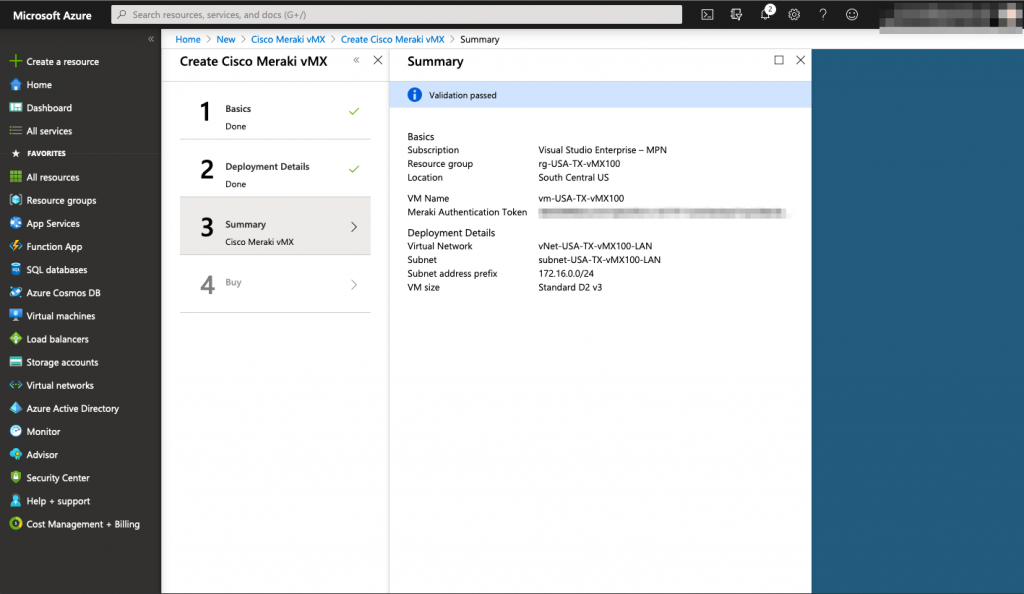
Meraki Azure – vMX100 Deployment 6

Wait for the virtual machine deployment completion and check in the meraki dashboard if the vMX100 in Azure has successfully fectched its configuration via the Meraki dashboard.
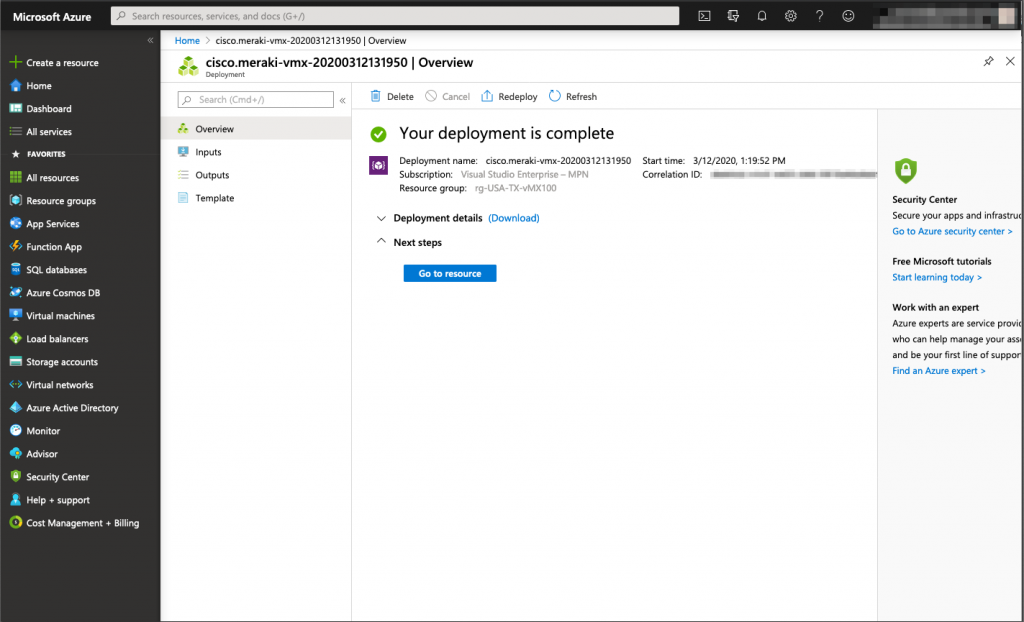
Meraki Azure – vMX100 Deployment 7

Up to this point, this is what has been created in Microsoft Azure.
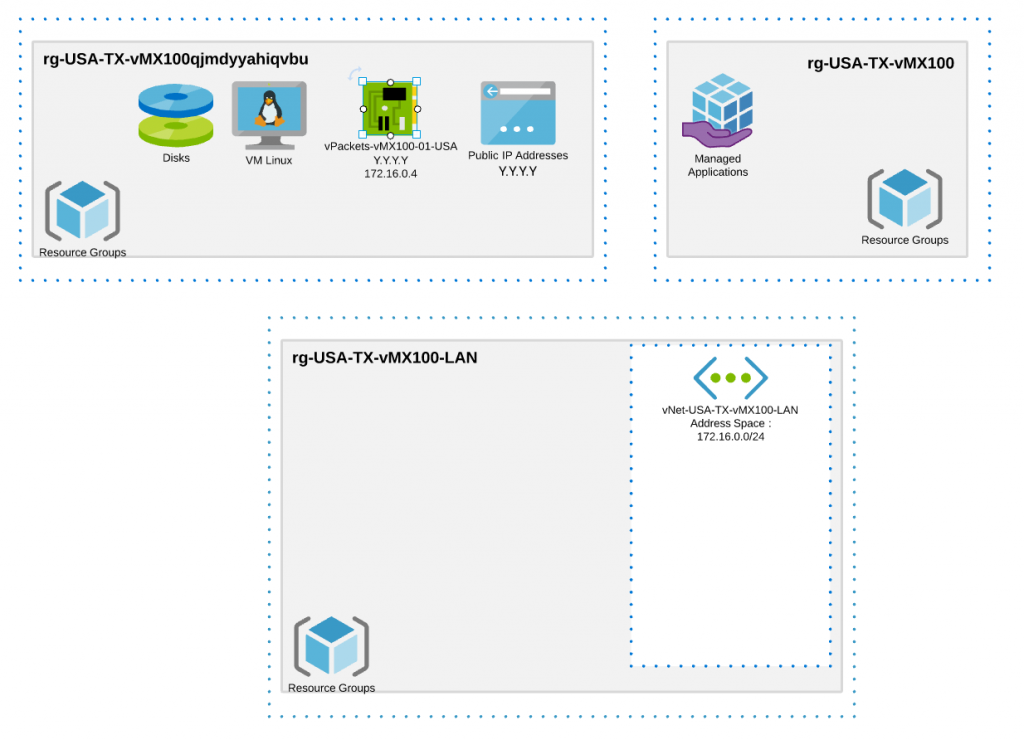
Meraki Azure – vMX100 Deployment 8

Let’s verify in the Meraki Dashboard if the vMX 100 is online and able to fetch its configuration.
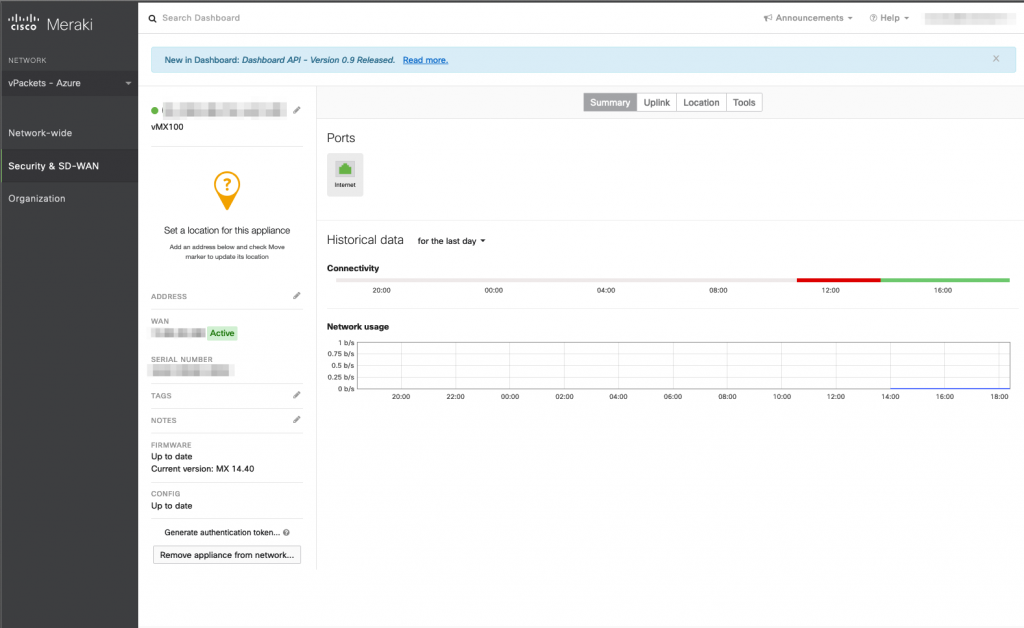
Meraki Azure – vMX100 Deployment 9

If you browse to the public IP of the vMX100, you will be able to see if it’s healthy and download some logs if needed (the serial number of the appliance is the login credential, there is no password).
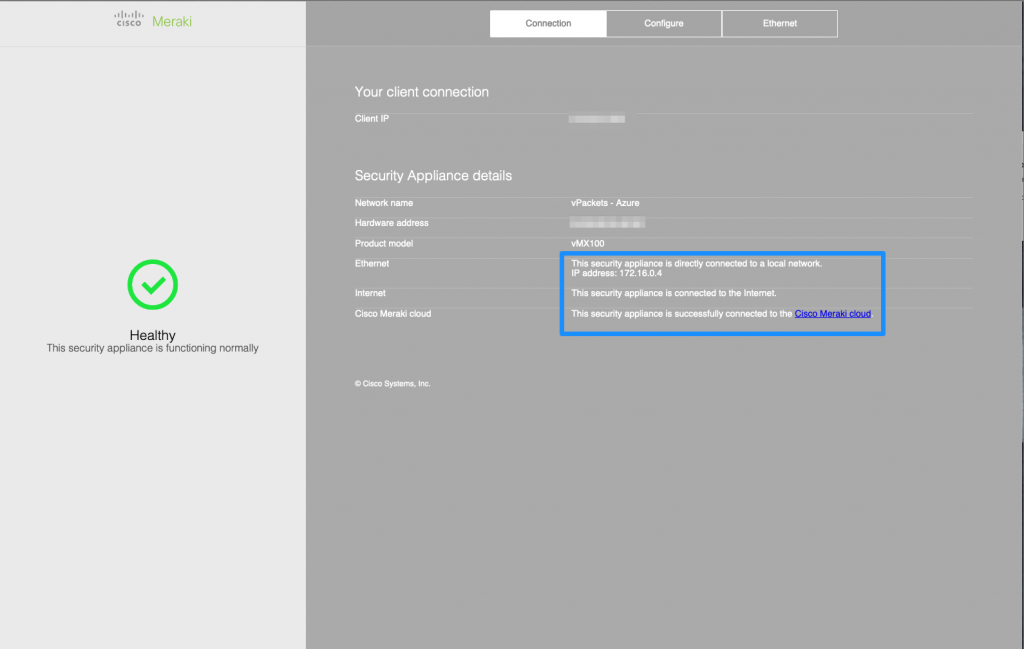
Meraki Azure – vMX100 Verifications

VPN Configuration

We can now start configuring the actual VPN and deploy some virtual machines. Make sure that both the vMX100 and the other Meraki Security Appliances (MX) are part of the VPN and are configured as hubs.
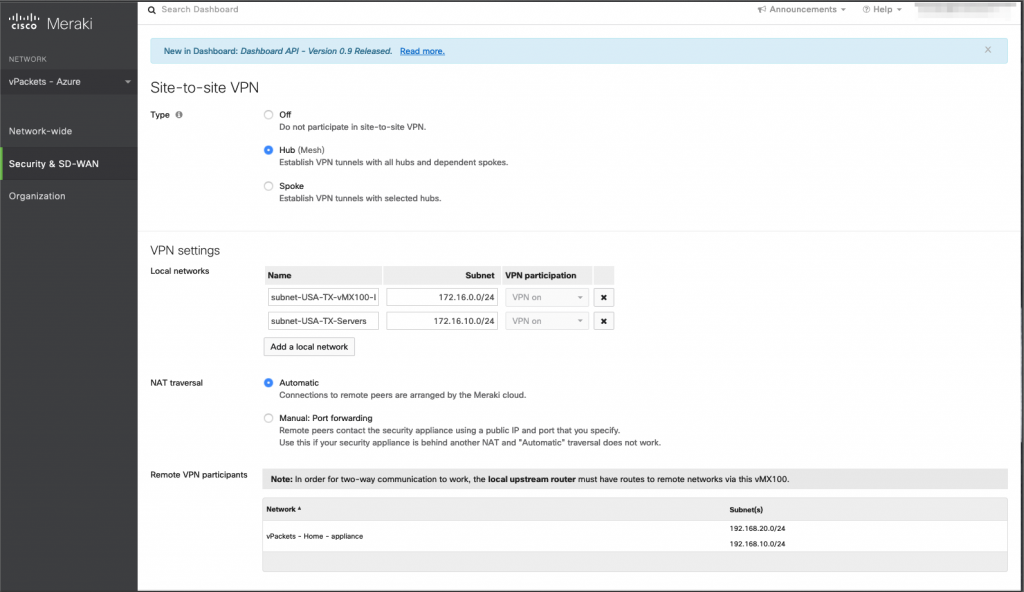
Meraki Azure – VPN Configuration.

We can check the VPN status in the meraki dashboard.
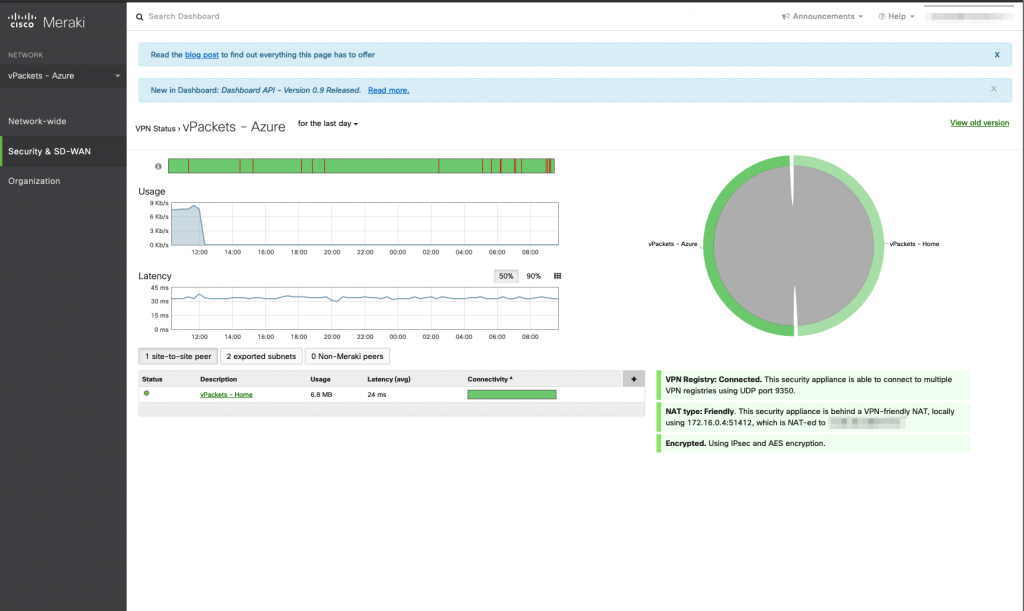
Meraki Azure – VPN Status


Now that the VPN is up we can verify by pinging the vMX100 interface

Virtual machine deployment

It is now time to deploy some virtual machines in Azure and create the peering between them and the Meraki vMX100.

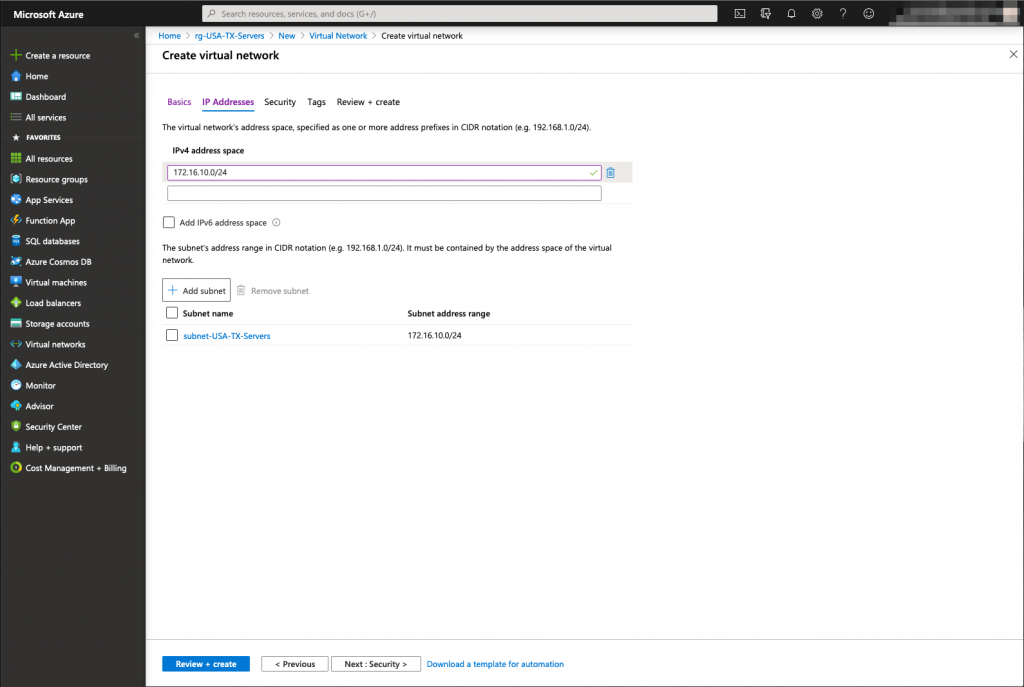
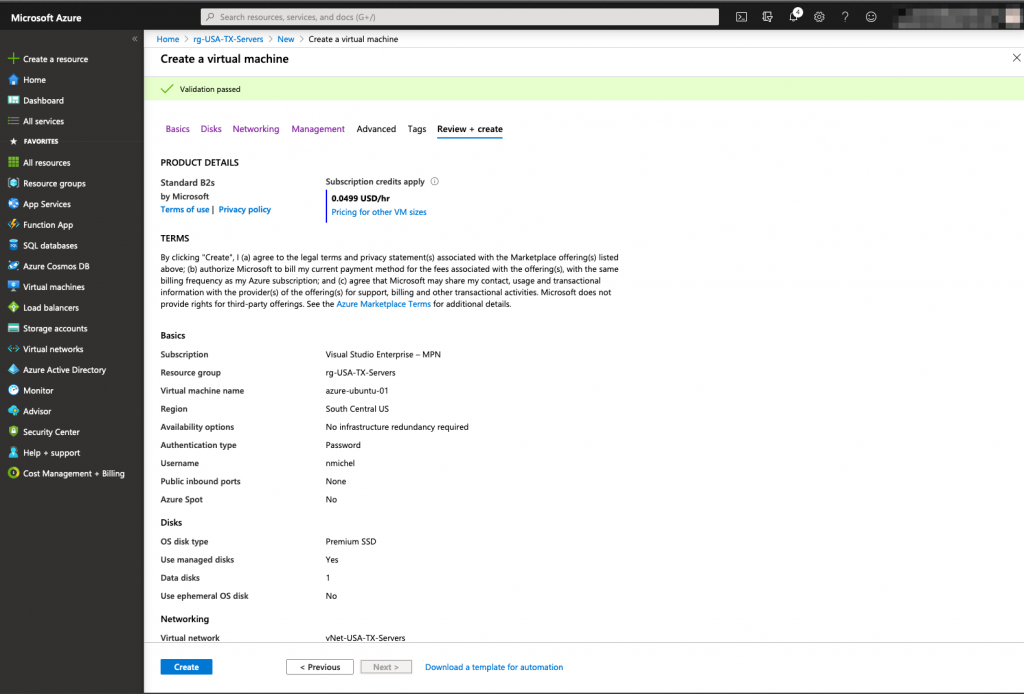
In order to do that, we need to deploy a resource group and a virtual network. These 2 objects will be used by the linux virtual machine that will be hosted in our Microsoft Azure instance. The subnet used inside the vNet will be 172.16.10.0/24
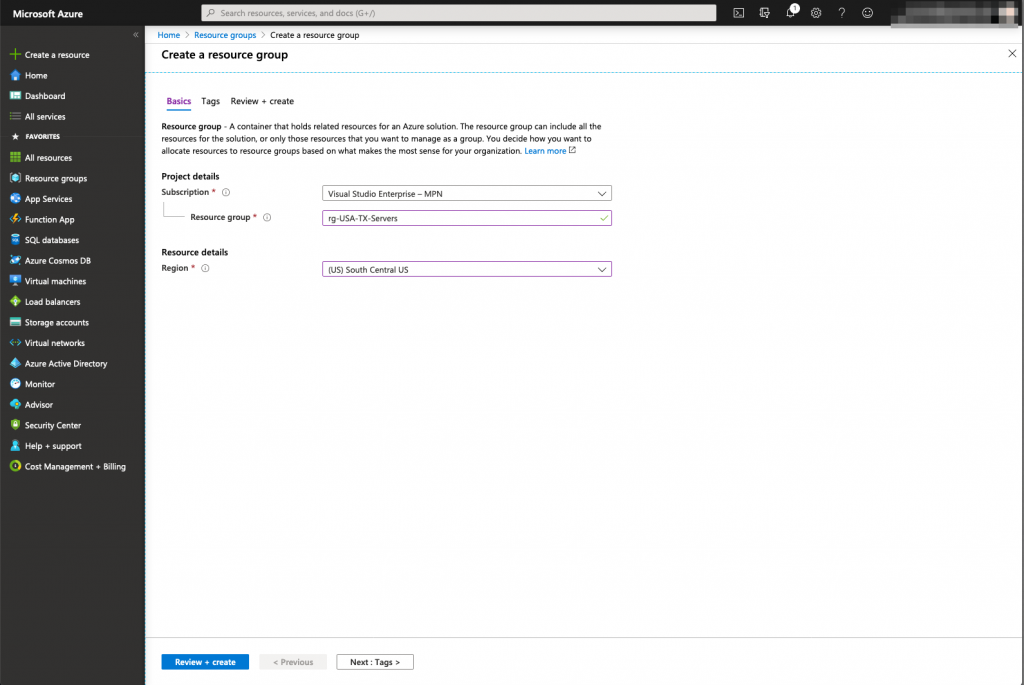
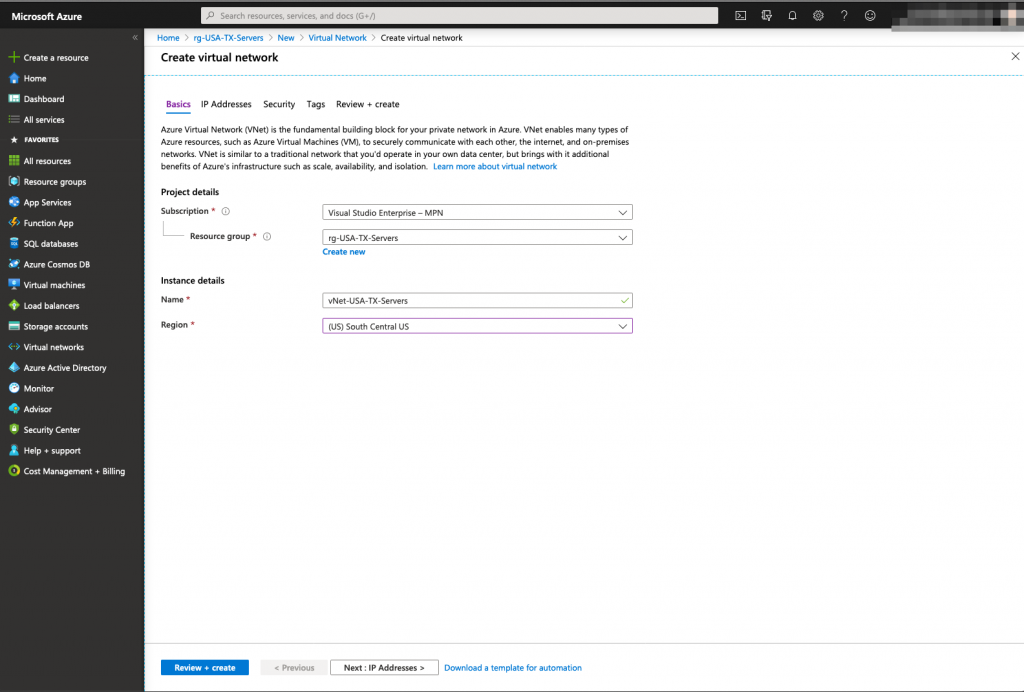
Creating a resource group for the Azure Servers
Creating a vNet for the Azure Servers

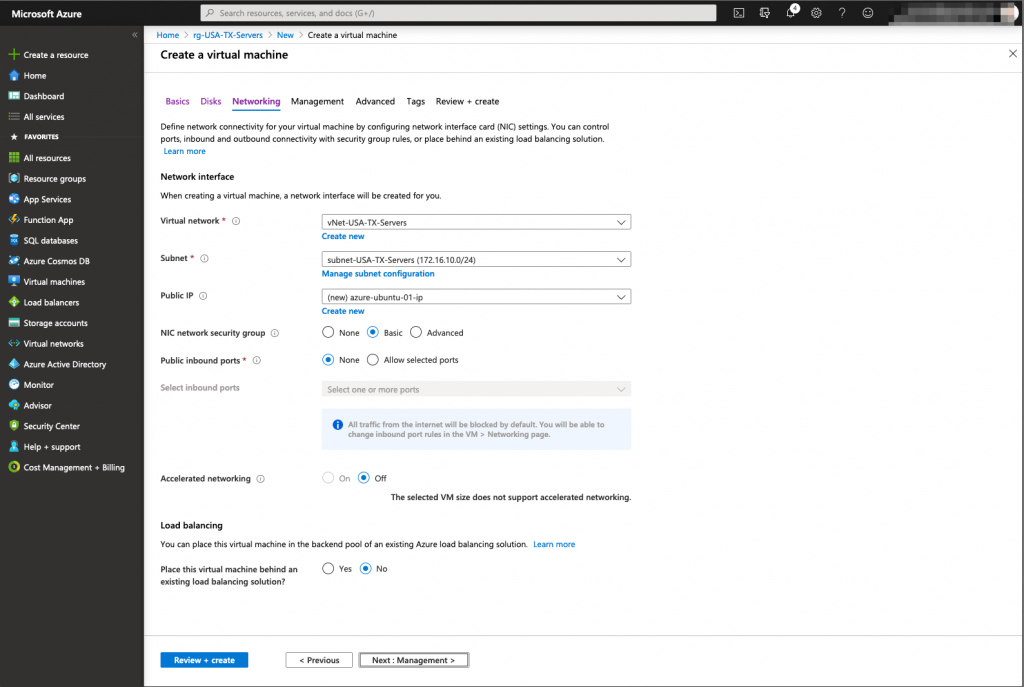
Now that we have the underlying infrastructure ready for the servers, we can deploy the virtual machines:
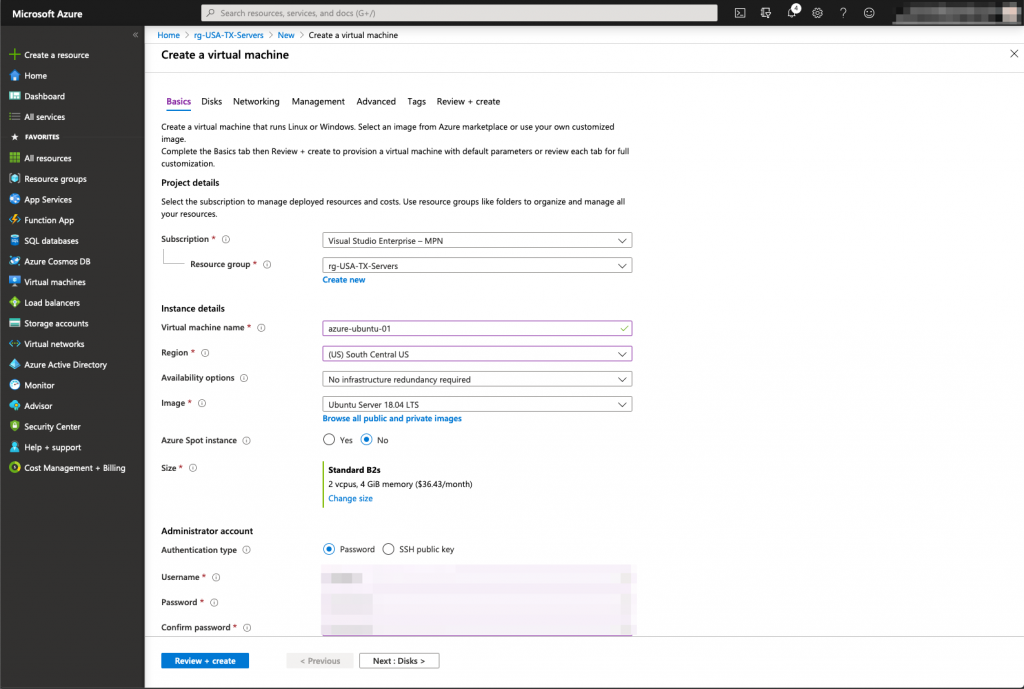
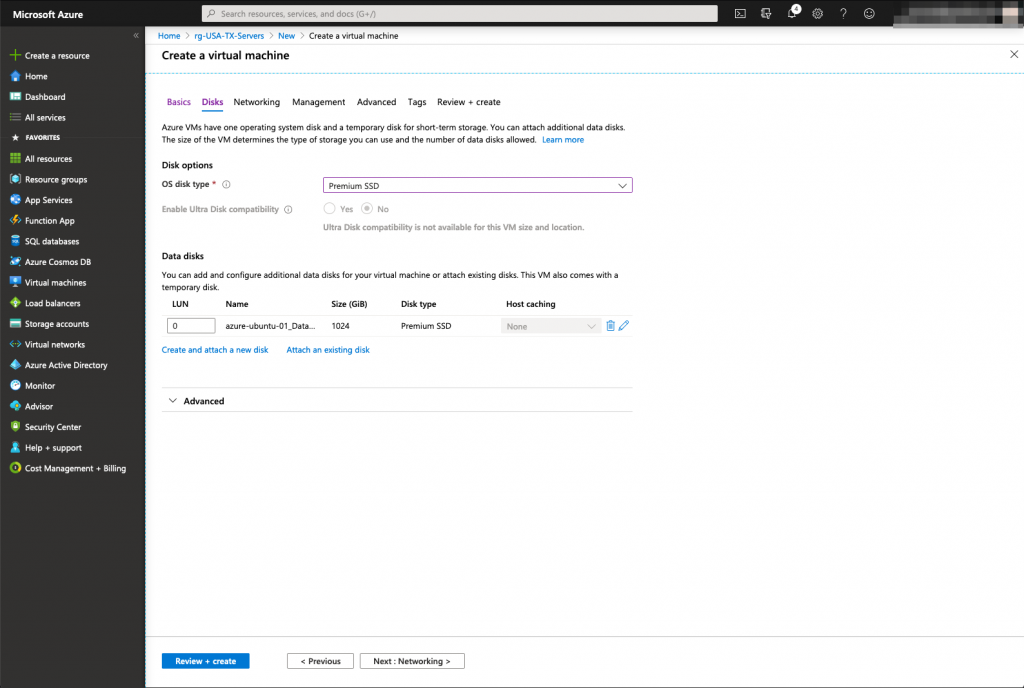
Meraki Azure – VM deployment 1
Meraki Azure – VM deployment – Disk
Meraki Azure – VM deployment – Network (172.16.10.0/24)
Meraki Azure – VM deployment

Azure Routing Table and vNet Peering

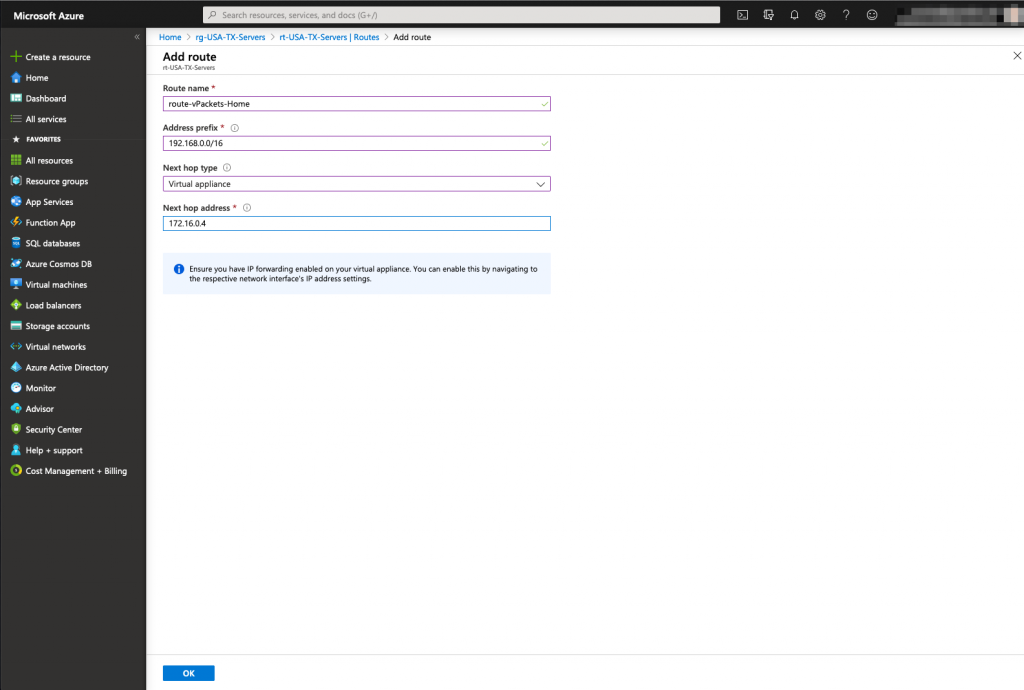
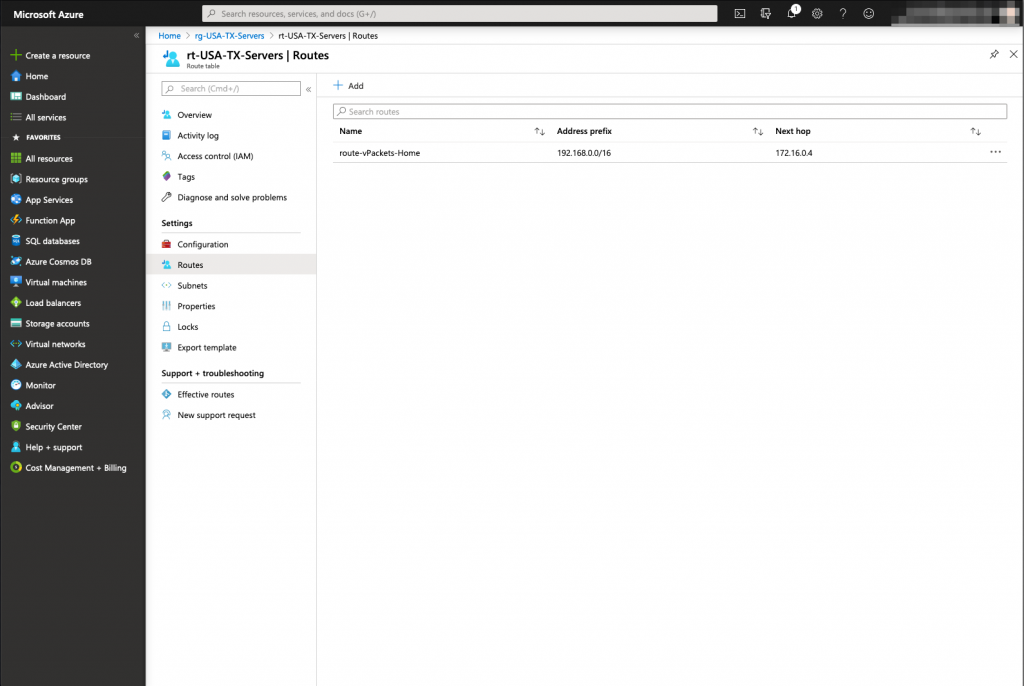
The last step is to create a route for the internal home network that will point to the single network interface of the vMX100 (in Cisco world, that would mean : ip route 192.168.0.0 255.255.0.0 172.16.0.4). A peering between both virtual network Azure Meraki Lan and Azure Servers is also mandatory to create the virtual communication between them

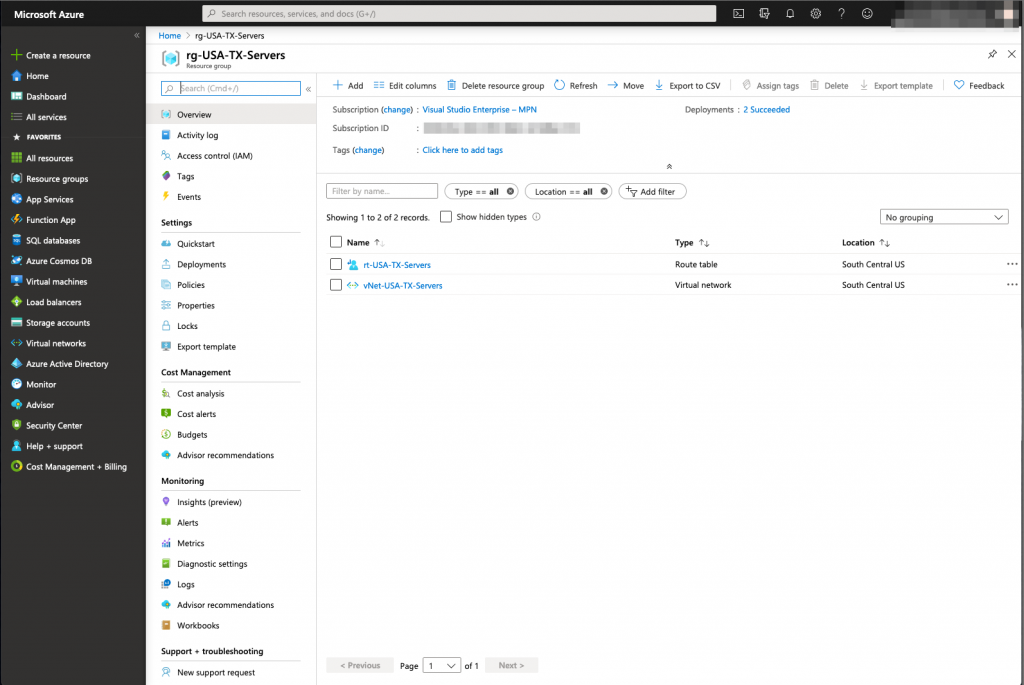
Route Table Creation
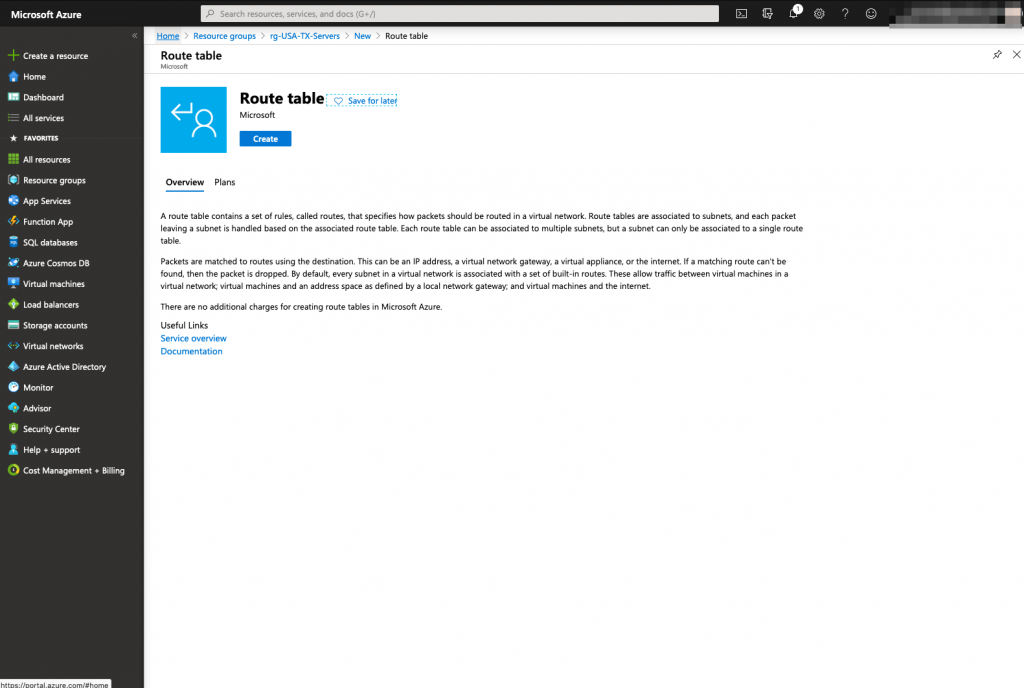
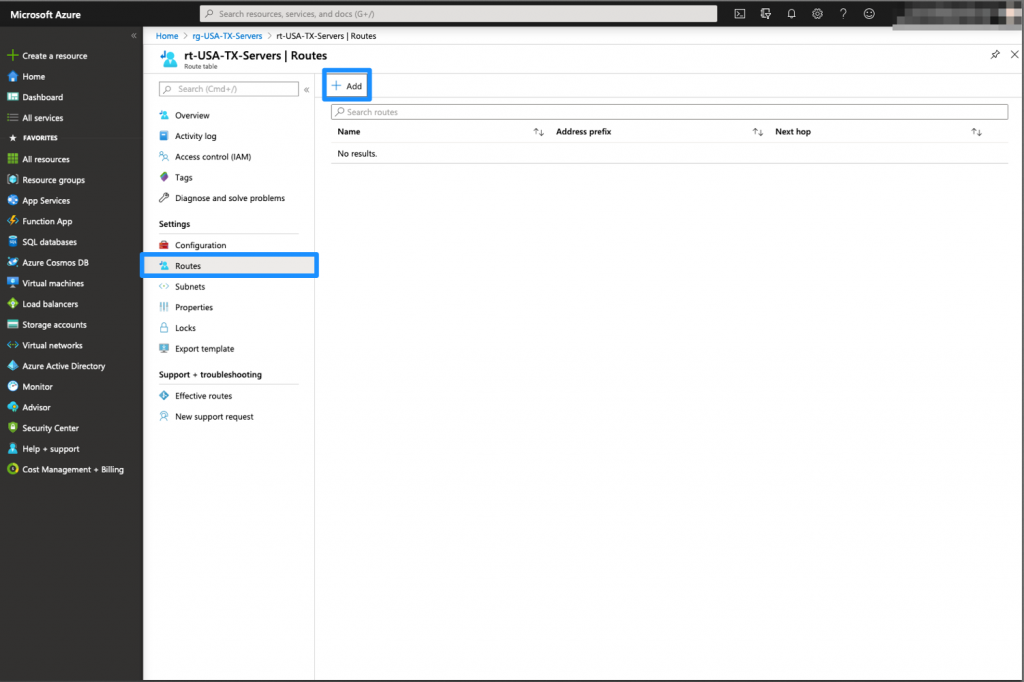
Meraki Azure – Route Table

The route table must belong to the vNet previously created.
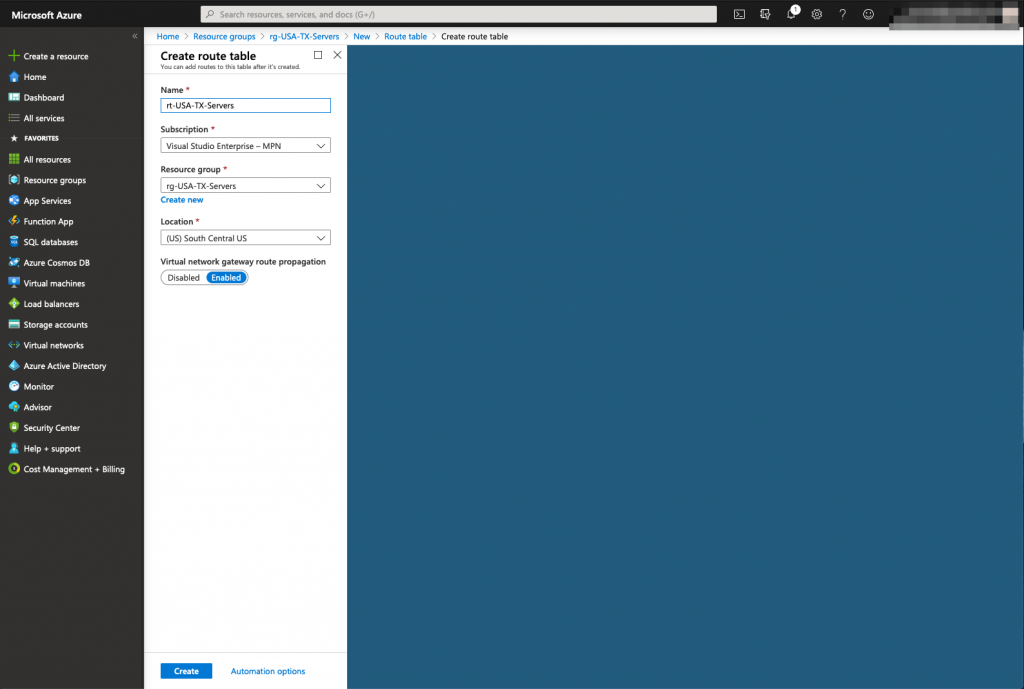
Meraki Azure – Route table 2
Meraki Azure -Route table 3
Meraki Azure – Route table 4
Meraki Azure – Route table – ip route 192.168.0.0 255.255.0.0 172.16.10.4

Meraki Azure – Route table

The Route table has been now created, we need to associate the accurate server subnets to that route table.
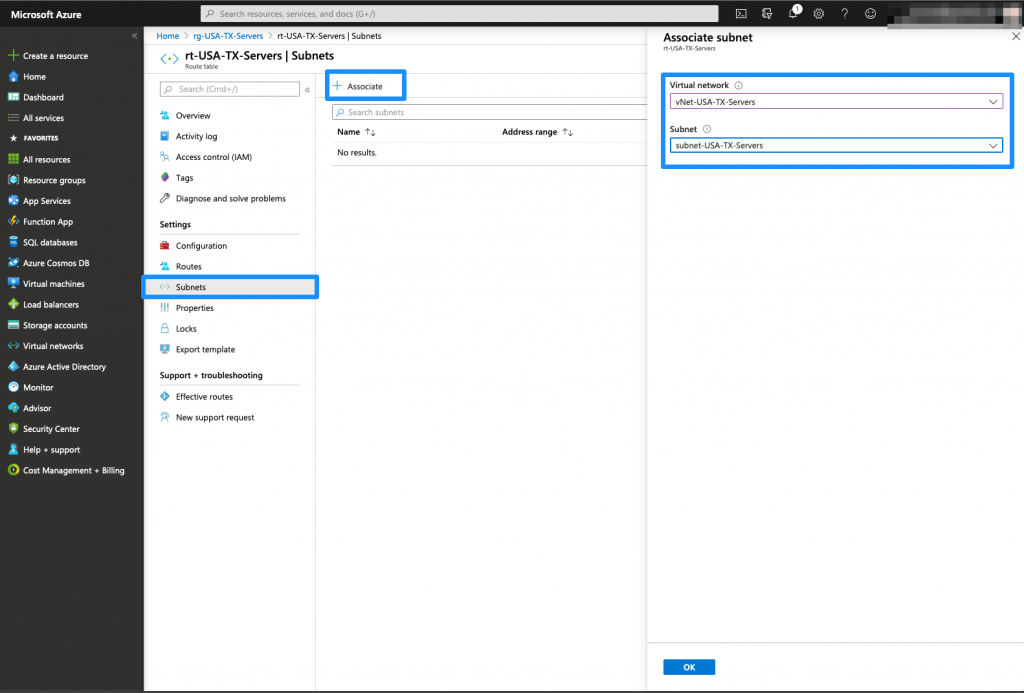
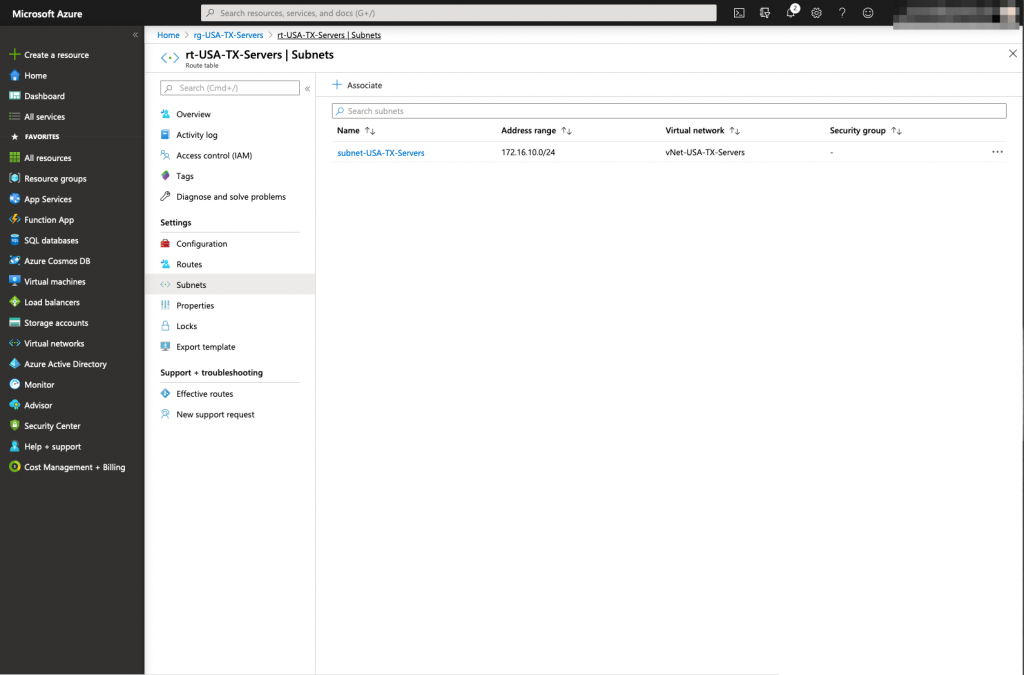
Meraki Azure – Route Table and Subnet Association
Meraki Azure – Route Table and Subnet associated

vNet Peering

Finally, The last task that needs to be achieved in order to provide connectivity between Azure and your on premises network, is to create a peering between the 2 vNets previously created.

On the Azure GUI, you will be able to create two peering in a single task, one for each direction (Servers to Meraki LAN and Meraki LAN to Servers).
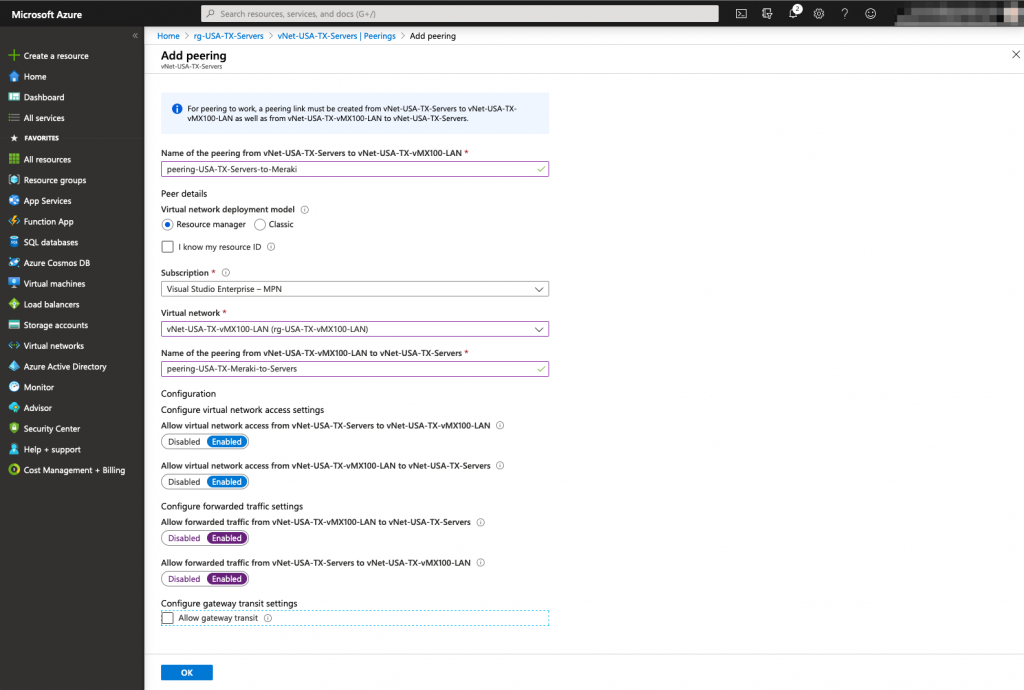
Meraki Azure – Peering configuration

Verify that the Peerings are in the connected state
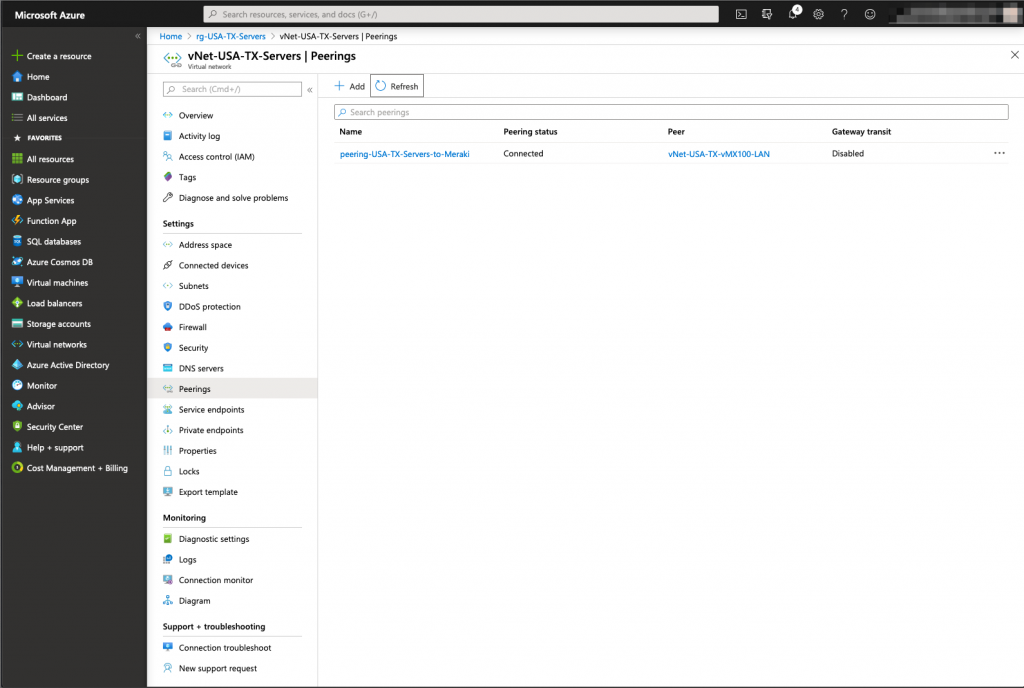
Meraki Azure – Peering verification

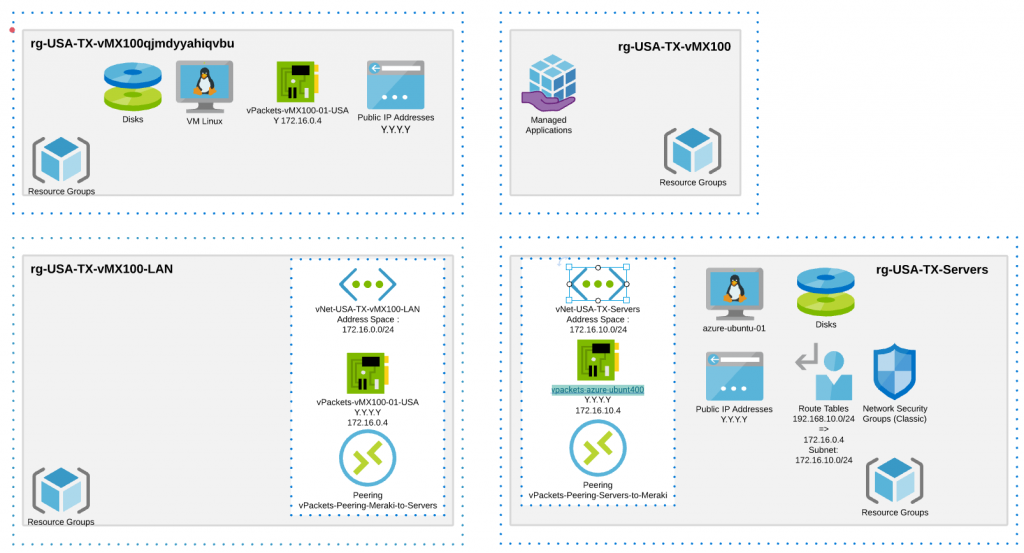
Final representation – Microsoft Azure Objects

Here is a reprensantation of the objects we have created in Azure so far:
Testing

Finally, we can test if we have the connectivity to Azure using a Virtual Private Network.

This was the manual way of interconnecting your Azure instances and your Home or Data Center workloads, it is definitely possible to automate it. Let me know what you think or if you have a question.

Hyper-converged infrastructure – Part 2 : Planning an Cisco HyperFlex deployment

I recently got the chance to deploy a Cisco HyperFlex solution that is composed of 3 Cisco HX nodes in my home lab. As a result, I wanted to share my experience with that new technology (for me). If you do not really know what all this “Hyperconverged Infrastructure hype” is all about, you can read an introduction here.

Cisco eased our job by releasing a pre installation spreadsheet and it is very important to read that document with great attention. It will allow you to prepare the baseline of your HC infrastructure. The installation is very straightforward once all the requirements are met. The HX infrastructure has an important peculiarity, it is very very very (did I say very) sensitive …. if one single requirement is not met, the installation will stall and you will be in a delicate situation because you could have to wipe the servers and restart the process. As a result, you could lose precious hours.

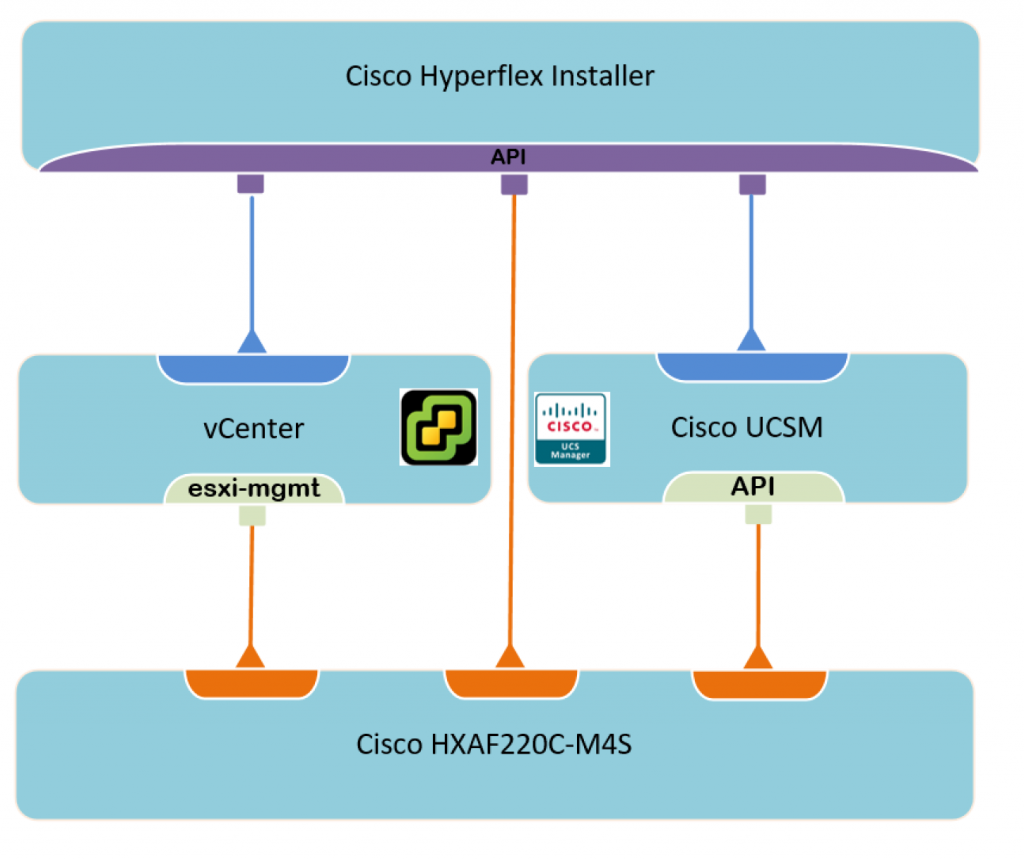
Cisco has a way to automate the deployment and to manage your HX cluster.Finally, The HX installer will interact with the Cisco UCSM, the vCenter, and the Cisco HX Servers.

It is especially relevant to note that the Cisco HX servers are tightly integrated with all the components described in the picture below:

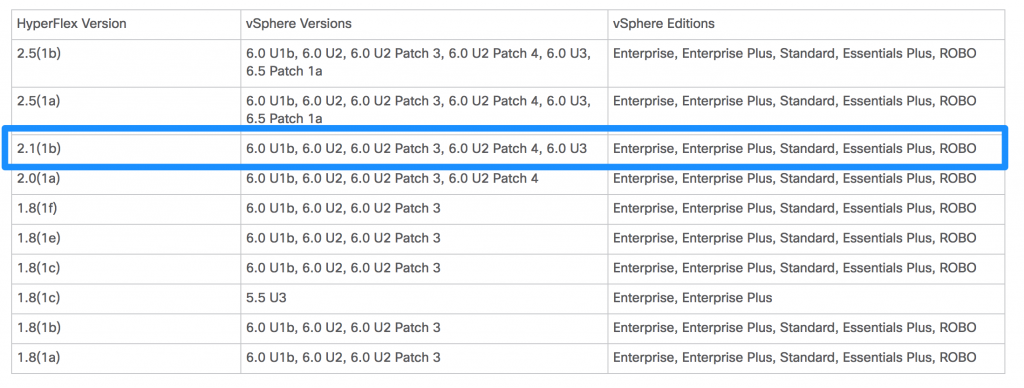
HyperFlex Software versions.

As usual with this kind of deployment, you have to make sure that every version running in your environment is supported.  We will run the 2.1(1b) version in our lab and will upgrade to 2.5 at a later time. We need to make sure that our FI UCS Manager is running 3.1(2g).

In addition, the dedicated vCenter that we will use is running the release 6.0 U3 with Enterprise plus licenses.

Nodes requirements.

You cannot install less than 3 nodes in a Cisco HyperFlex Cluster. Because the HX solution is very sensitive, it is mandatory to have some consistency across the nodes regarding the following parameters:

  • VLAN IDs
  • Credentials 
  • SSH must be enabled
  • DNS and NTP
  • VMware vSphere installed.

Network requirements.

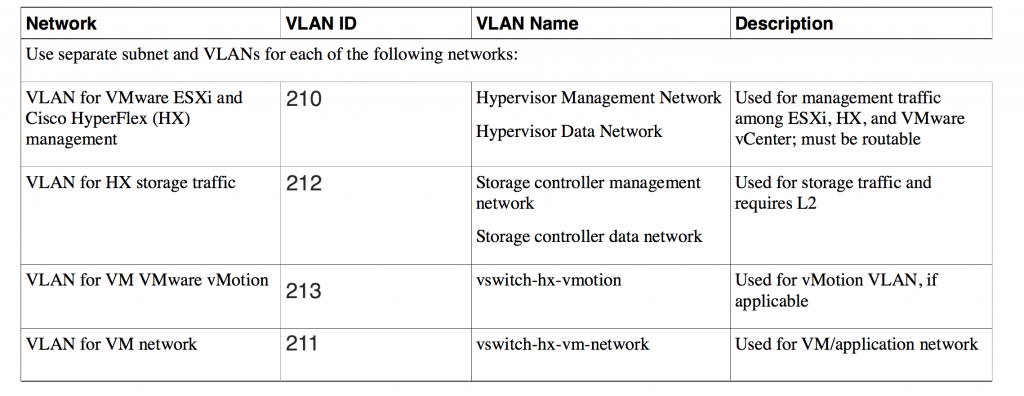
First of all, the HyperFlex solutions require several subnets to manage and operate the cluster.

We will segment these different types of traffic using 4 vlans:

  • Management Traffic subnet: This dedicated subnet will be used in order for the vCenter to contact the ESXi server. It will also be used to manage the storage cluster.
    • VLAN 210: 10.22.210.0/24
  • Data Traffic subnet: This subnet is used to transport the storage data and HX Data Platform replication
    • VLAN 212: 10.22.212.0/24
  • vMotion Network: Explicit
    • VLAN 213: 10.22.213.0/24
  • VM Network: Explicit
    • VLAN 211: 10.22.211.0/24

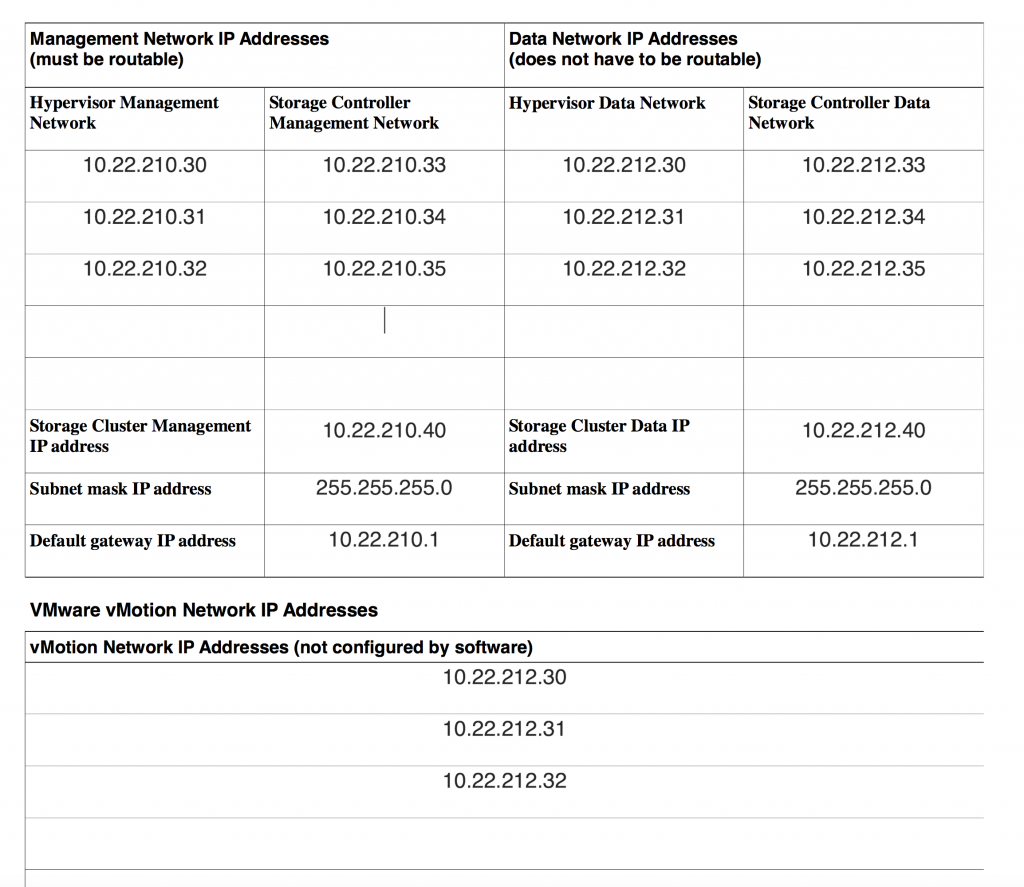
Here is how we will assign IP addresses to our cluster:

UCSM Requirements.

We also need to assign IP addresses for the UCS Manager Fabric Interconnect that will be connected to our Nexus 5548:

  • Cluster IP Address: 
    • 10.22.210.9
  • FI-A IP Address:
    • 10.22.210.10
  • FI-B IP Address:
    • 10.22.210.11
  • A pool of IP for KVM:
    • 10.22.210.15-20
  • MAC Pool Prefix:
    • 00:25:B5:A0


DNS Requirements.

It is a best practice to use DNS entries in your network to manage your ESXi servers. Here we will use 1 DNS A records per nodes to manage the ESXi server. The vCenter, Fabric Interconnect and HX Installer will also have one.

The list below will show all the DNS entries I have used for this lab:

  • srv-hx-fi
    • 10.22.210.9
  • srv-hx-fi-a
    • 10.22.210.10
  • srv-hx-fi-b
    • 10.22.210.11
  • srv-hx-esxi-01
    • 10.22.210.30
  • srv-hx-esxi-02
    • 10.22.210.31
  • srv-hx-esxi-03
    • 10.22.210.32
  • srv-hx-installer
    • 10.22.210.211
  • srv-hx-vc
    • 10.22.210.210

This sounds very basics and as a consequence, it is CRITICAL that these steps are performed PRIOR any deployment otherwise you will waste a lot of time trying to recover (at some point you would have to wipe your servers and reinstall a custom ESXi image on each one). 

Finally, In the next blog post, I will show how to install the vCenter, The Fabric Interconnect and the HX installer needed for the HyperFlex deployment.

In conclusion, do not hesitate to leave a comment to let me know if you encountered any issue while planning your deployment.

Thanks for reading!  

Hyper-converged infrastructure – Part 1 : Is it a real thing ?

Recently I was lucky enough to play with Cisco Hyperflex in a lab and since it was funny to play with, I decided to write a basic blog post about the hyper-converged infrastructure concept (experts, you can move forward and read something else 🙂 ). It has really piqued my interest. I know I may be late to the game but better late than never right? 🙂

Legacy IT Infrastructure

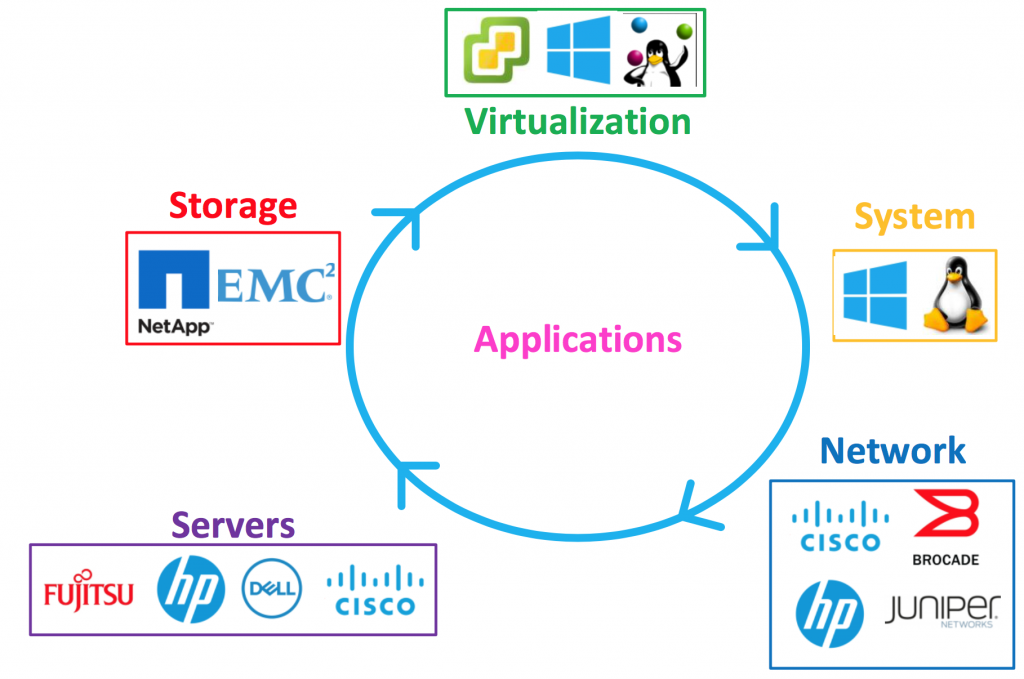
Back in the days, you had to have separate silo to maintain a complete infrastructure (it is still true by the way, but it tends to become more and more frequent that networks, servers, and storage are progressively forming a single IT platform …. sorry I meant “cloud”):

  • Compute(System and Virtualization)
  • Storage
  • Network (Network and Security)
  • Application

You had to install and maintain multiple sub infrastructures in order to run the IT services in your company. 

If  you wanted to deploy a greenfield infrastructure for your data center, here is a brief summary of what you needed:

  • Physical servers (Owners: System team)
  • Hypervisors (Owners: System team)
  • Operating system (Owners: System team) 
  • Network infrastructure (Owners: Network team)
    • Routing – Switching
    • Security (VPN, Cybersecurity)
    • Load Balancers
  • Storage arrays (Owners: Storage team)
  • Applications for the business to run. (Owners: IT applications team)

Each silo has its own experts and language (LUN + FLOGI vs GPO + AD vs OSPF, BGP and TLS). As you can guess, it was a bit complicated and long to provision new applications and services for any business (even in a brownfield IT environment). Once everything was running, the IT team was in charge to maintain the infrastructure and one of the drawback was dealing with several manufacturers (and potentially partners) to maintain your infrastructure…. 

Converged Infrastructure and simplification

In the late 2000s, famous manufacturers saw an opportunity to simplify the complexity of the complete data center stack and converged infrastructure was born.

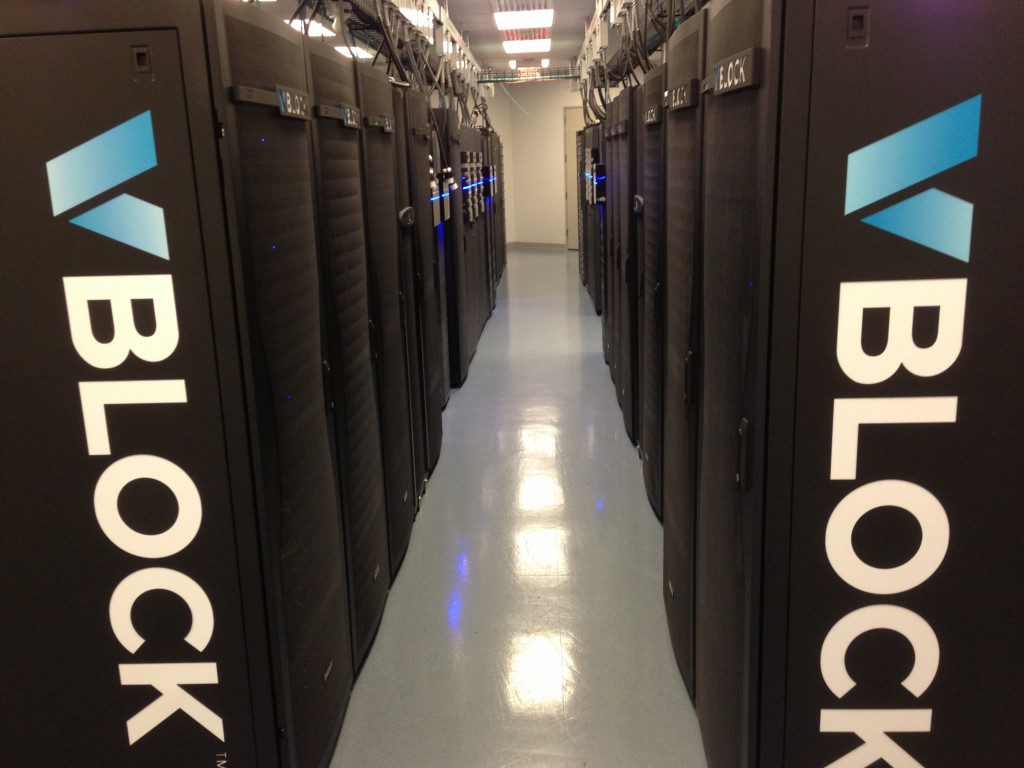
With the emergence of cloud applications, EMC and Cisco created a joint venture Acadia that will later be renamed VCE for (VMware, Cisco, EMC). The purpose of that company was to sell converged infrastructure products. Vblock was the flagship product. As you know, you could buy an already provisioned rack that was customized according to your preferences. The vBlock was composed of the following individual products:

  • Storage Array: EMC VNX/VMAX 
  • Storage Networking: Cisco Nexus, Cisco MDS
  • Servers: Cisco UCS C or UCS B
  • Networking: Cisco Nexus
  • Virtualization: vSphere

VCE was in charge of configuring (or customizing I should say) the vBlock according to your need and preference.

Once the network was delivered, you “just” had to plug it in your data center networking infrastructure and everything should be connected. Servers were ready to be deployed.

Going that way, you could save time and trouble. Agility is also a big selling point for these kinds of architectures. 

As you can see, the footprint for these products was still consequent. in this case, you had to deal with a single manufacturer but the main drawback is the product flexibility. You could not install any version on your Cisco Nexus because VCE was very strict on the supported version.

Hyper-converged Infrastructure and  horizontal scaling

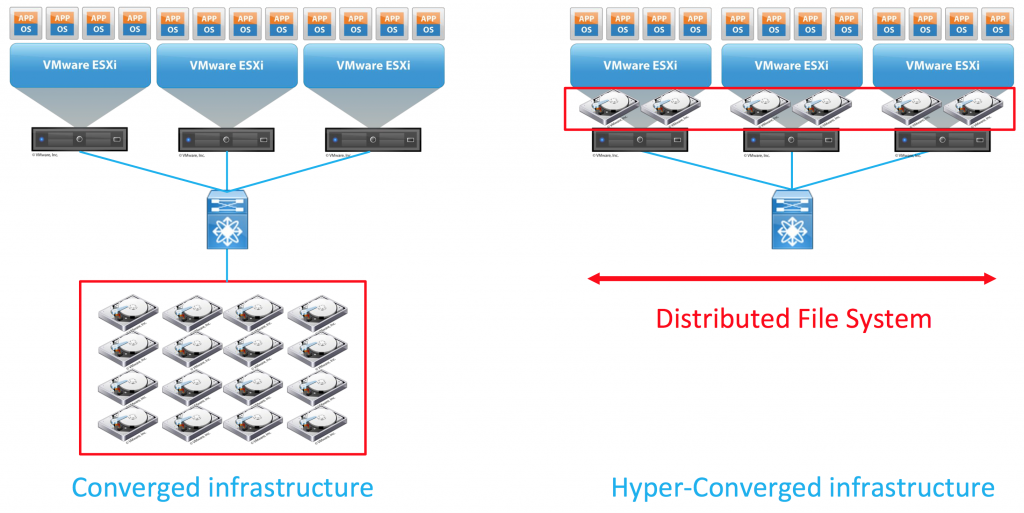
Hyper-converged is a term that has been rolling since 2012. The main difference between converged and hyper-converged infrastructure is definitely the storage 

  • Converged infrastructure:
    • Centralized array accessible using a traditional storage network (FC with FSPF or ISCSI/NFS)
  • Hyper-converged infrastructure:
    • Distributed drives in each servers forming a centralized file system.

Hyper-converged system has the ability to be adaptable. The way it scales is horizontal while reducing the footprint by a significant amount. If you just want to try it, just perform a setup with few hosts and if the solution works for you, just add nodes to the cluster horizontally and you will increase your performance and redundancy.  This way, you can consolidate your compute and storage infrastructure.

Horizontal scaling is a familiar concept for many network engineers (Clos Fabrics anyone?)

In my opinion, it is a natural evolution of the Data Center compute and storage infrastructure.

There are several “Hyper-converged” manufacturers on the market:

My next post will be about deploying a Cisco Hyperflex infrastructure.

Thanks for reading !


My CCIE Journey – Act II

CCIE_DC_Logo
In fact the title should be “My CCIE Journey – Act III” but I don’t want to use that one because I had a bad experience with the CCIE Voice lab exam 🙂

There are many (very good) links about that specific subject but I wanted to give my own opinion as well :). Here is a list (incomplete for sure) of the people that have blogged about their CCIE DC lab experience :

I have shared my journey towards the CCIE RS in 2011 and I wanted to share it again with you. I passed the CCIE DC lab exam one month ago and it was tough, long, hard,arduous, baffling, difficult, exacting, exhausting, hard (yeah I already used it on purpose 🙂 ), intractable,perplexing, puzzling, strenuous, thorny, troublesome, uphill.

As soon as I failed my CCIE Voice exam, my frustration went so high and I needed a break from the Voice exam a little bit. The Data Center exams were released by Cisco and I always wanted to be involved in a Data Center infrastructure project. I immediately decided to jump into the DC field and start to climb the (infinite) ladder.

At this time my DC infrastructure background wasn’t enough to pass the CCIE DC Written, I decided to spend a year reading books and solidify my knowledge.

First and foremost the CCIE DC blueprint is like any CCIE DC, it is VERY large. As an expert that will face customers and other experts, you definitely have to dig very deep to understand what’s going on in every section of your infrastructure (Compute / Storage / Infrastructure).

In my previous CCIE Journey post I used this expression from Brian McGahan: “a CCIE journey is not a short race, it is a marathon”. 4 years after, this applies even greater today. If you have a family, you better have to have a very supportive wife/husband. My wife is the most supportive person I’ve ever met.

We had our 3rd baby 10 months ago and my daughter couldn’t sleep at night. My wife was taking care of all 3 children 24/7 while I was studying. She even stayed at my parents home for several weeks to make my study time more efficient. After all, I can say that we are both CCIE RS-DC right now :).She deserves the title as much as I do … I am pretty sure that the CCIE exam is easier than taking care of the children. What I am trying to say here, is that you have to be dedicated to this exam.

CCIE Written Preparation

I already mentioned before but I read LOTS and LOTS of books. I will give you my list very soon but first I would like to start with one of the best technical book I have read in my entire career.

Data Center Virtualization Fundamentals  written by Gustavo Santana is definitely the best Data Center book out there. If you have some Routing and Switching Skills, you probably read the very famous Routing TCP/IP Books (Volume 1 covers IGP and Volume 2 covers BGP,Multicast and IPv6). All I can say is that Santana is as awesome as Doyle. I don’t want to overemphasize but I really enjoyed every words of the book.

HTML5 Icon
 

The others books are the following:

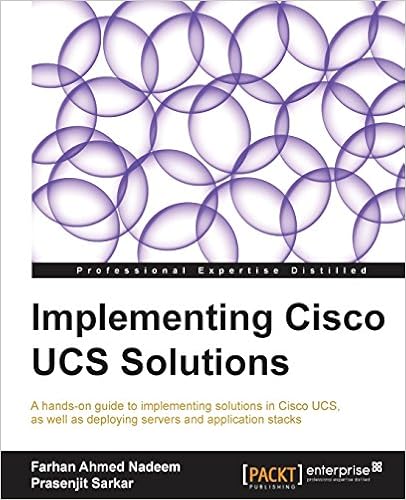
  • Cisco UCS (a bit outdated but still nice to understand)

HTML5 Icon

HTML5 Icon
 

HTML5 Icon

HTML5 Icon
 

HTML5 Icon
 

I also read some free ebooks written by EMC and IBM. To me these 2 books regarding Storage Area Networks are great free resources:

I was almost ready to sit the CCIE DC Written exam but I decided to solidify all the theory I have gained throughout the year. In order to do that I gave a look at CCIE Training vendors.

I have a very good experience with all the main vendors and this is probably the most frequently asked question so far : “Which vendor did you use for your preparation”

First I never really picked up a vendor. I tend to prefer to choose an instructor. I went with INE and Micronics Training for my CCIE RS because I heard from close friends that Brian McGahan and Narbik were top notch instructors (and they are). For my voice studies, I went with IPX because Vik Malhi is the best Voice Trainer I’ve ever met (Since that time, Vik has its own training company CollabCert, you should definitely give it a try if you are interested in collaboration). So in my opinion, students should not pick a vendor, they should pick an instructor and an instructor that meets your personal requirements. Maybe McGahan, Kocharian and Malhi are not the best for you but I can tell you from my personal experience that they are the best for me.

Choose wisely ! A training vendor business is to make your studies time efficient.

I bought an All Access Path from INE and decided to enroll myself into the CCIE Data Center Written Bootcamp. If you want to have a look of the teaching style:

 The INE videos are matching all the blueprint : Nexus / Storage / UCS.

There is another useful (free) resource available for you guys: Cisco Live Portal. This place is the place to watch deep dive videos regarding every Cisco topic!  For the DC stuff there are many listed by Brian McGahan on its “how to pass the CCIE DC” blogpost.

I passed my CCIE DC written exam on my second try. It was a really tough exam …

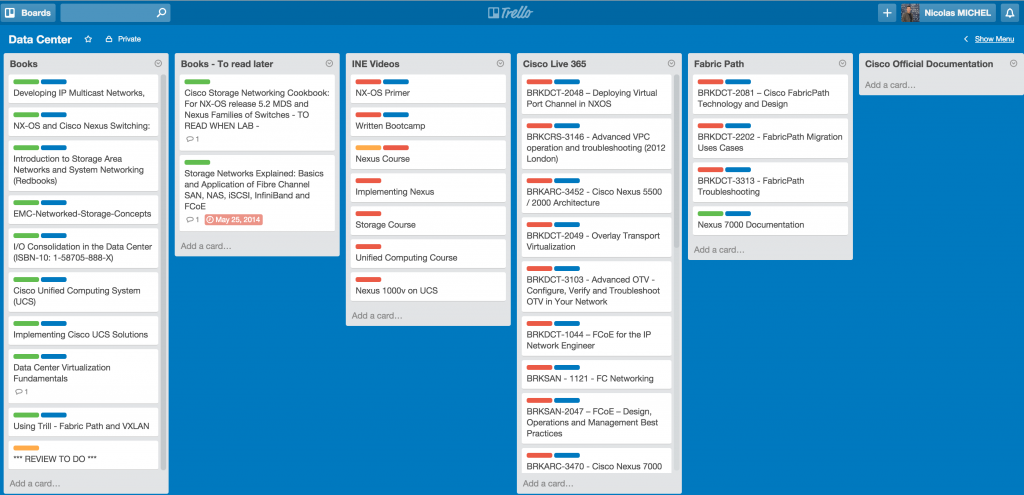
In order to track my studies during the journey, I have used trello and I love this app. Here is an example of how I managed my tasks

Trello_DC

CCIE LAB Preparation

The lab is a complete different story and I didn’t really relied on any vendors regarding the workbooks. I used INE and IPX for my online bootcamp but I will cover that later.

So regarding the workbooks, I didn’t really use any of them … I just did a few lab here and here from both vendor but I didn’t really like it. I just wanted to read the config guide, build the infrastructure and then run every show command I could.

For CCIE RS and Collaboration, it is very easy to host a rack in your home or at work. For the DC track, things can get more tricky since you will need a N7K (with VDCs you slice your switch into multiple virtual switches, don’t worry it is part of the blueprint 🙂 ), 2x N5K ,2x Nexus 2232 PP (in order to run FCoE), 2x MDS (9222 is my choice) and a small JBOD (I will make a separate post to show you how to build the cheapest JBOD ever 🙂 ).

INE and IPX racks can be very busy if you want to book the racks with UCS … I also recommend to use the Cisco UCS Platform Emulator on your own laptop (run on ESXi as well if you have a virtualization lab). You can do almost everything with it (except booting your favorite Operation System / Hypervisor).

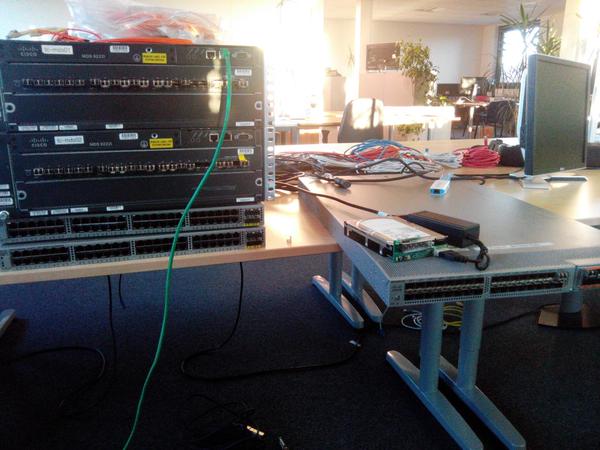
My local Cisco SE (Vincent, thank you so much !) was kind enough to let me borrow 2x N5K with some FEX and  2x MDS 9222i. I have built a cheap jbod and I could test 100% of the storage feature for the lab exam.

CCIE DC Lab
I think the most valuable resources to practice is the Cisco Partner Education Collection .

There are so many labs and hardware there (sometimes fully booked of course) than you can spend countless hours of labs … Joel Sprague (which is an MVE [Most Valuable Engineer] I met during my studies) did a very good job by posting all the valuables labs that you can do with the Cisco PEC. I didn’t do ALL of them but the vPC / Fabricpath / UCS / N1000v are definitely mandatory … The UCS is one of the best because you can boot from SAN and the UCS is yours for 8 hours and for free.. Nothing can beat that !

CCIE DC UCS
 

Even if you are studying for the CCIE LAB exam and that you know that you are going to spend 8 tough hours configuring weird things, you still need to read a lot in order to configure your infrastructure.

I would recommend to read almost all the configuration guides related to the blueprint for the Nexus. For UCS and MDS, You can periodically check but there is no need to read everything like you should do for the nexus part.

I have watched both INE and IPX videos regarding the CCIE lab exam, McGahan and Rick Mur videos are perfect ! McGahan for INE was in charge of storage and Nexus while Snow was in charge for UCS.

I also attended 2 CCIE online bootcamp from INE (McGahan Again) and IPX with Jason Lunde. Both did a great job.

McGahan is definitely the big player here, his complete set of videos (Nexus – Storage – Lab Cram Session) are simply awesome. It covers way more than you need for the CCIE DC exam

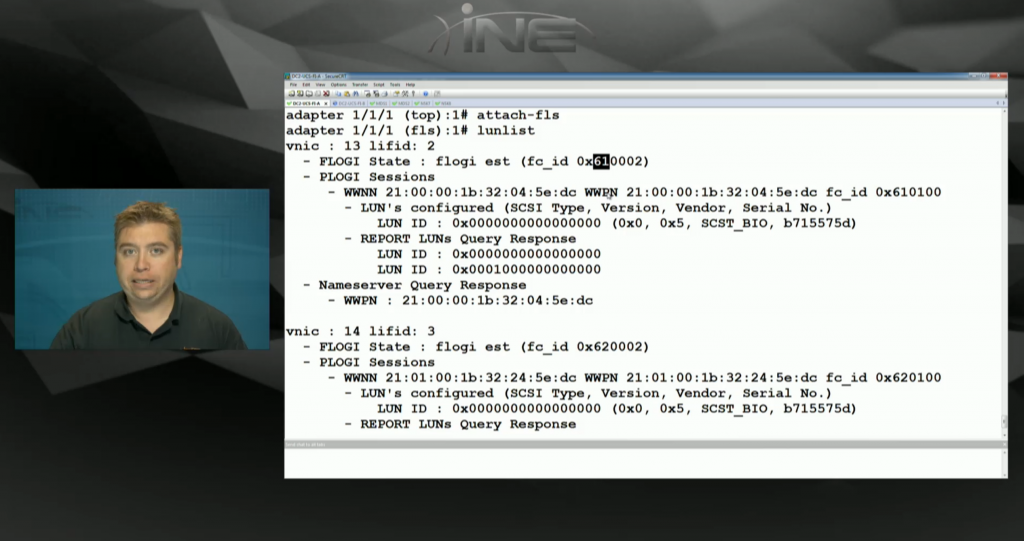
Here is a preview of its DC lab cram session:

BM DC Lab
There are plenty of nice other resources that other CCIE DC have published on their own blog. Here is the 3 I used during my studies:

CCIE LAB Exam

I decided to book the CCIE the day before my vacations started because I didn’t want to go in vacations with the CCIE still in mind 🙂

So I went to Brussels on July 10th and I was very pleased by the proctor (if you read me, I would like to thank you. The experience was great). The exam is fair, it is hard but fair. There are no second guess like I had in voice. Questions were very precises and if I didn’t understand everything in the question, the task title made me clicked in my head : “Gotcha”.

You have to CAREFULLY read the tasks. If Cisco is asking for an ACL named MYCCIEDCLAB, you will not get the point if you configure it MYCCIEDCLAb. Even if your configuration is correct, they will look for the right naming convention. If you want to prevent all sorts of easy mistakes, your best weapon is the CTRL+C , CTRL+V. I can tell you this is the best thing you will ever need in the lab. Notepad is so useful as well !

During your daily job you would still do it right ? What if you want to configure vlan 100,200,300,400,500,600 in all your devices (let’s assume VTP is bad … wait a minute … it is bad .. in my opinion 🙂 ) You would open a notepad, type your commands , and paste into all devices right ?

My advice is to do the same for your CCIE Labs.

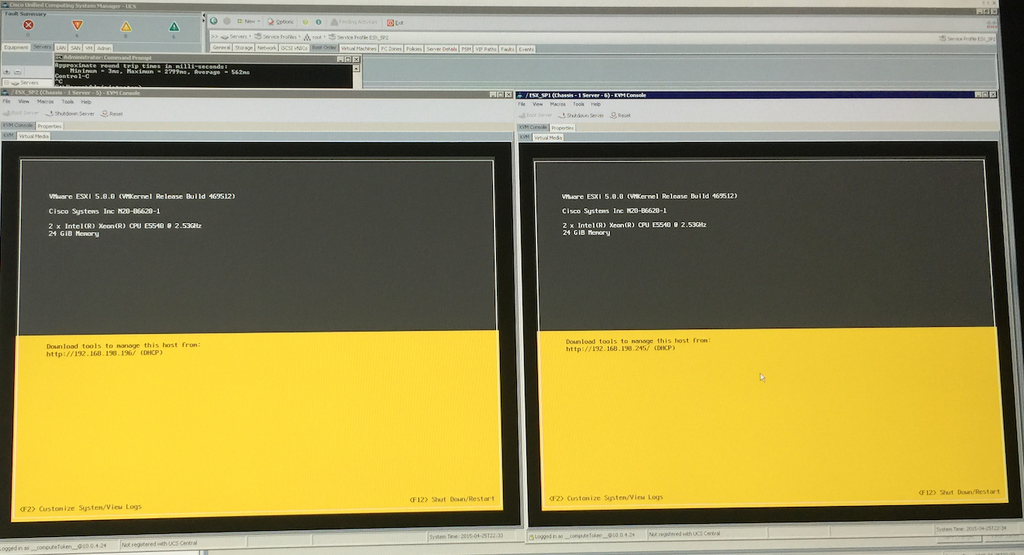
As Brian McGahan said, I did my happy dance when you see the UCS-B series booting ESXi 🙂

HTML5 Icon
I finished the lab with 1 hour left. Now the critical thing to do was to stay there and look for small mistakes I could have make during these very long 8 hours. I found some and for every tasks I checked that what I did was still working and that 100% of the requirements were met.

Finally I left the building and asked the proctor when can I expect the results to be delivered. He told me : “within few hours” . I thought he was making fun of me but he was right.

I went to the airport to meet a friend from Belgium and I received the score report notification.

Was thrilled to see the results : “PASS”

The exam can be tought but again it is doable. During my studies I have met a much better DC engineer than me, he failed the exam twice 🙁 . So please be sure to read slowly and try to understand what they really want…

So what’s up to me now that I am a double CCIE. In the beginning of the post I said that I started to climb the infinite ladder, what does that really mean ? It doesn’t mean that now that I am a CCIE, I can rest and that I can live like that and that my knowledge will stay at the same level through my career. People who think they are done with learning  are wrong.

Knowledge has to be sustained ! I still have to work on every protocol if I want my knowledge to be intact. I also have to learn new emerging technologies like Dev-Ops (not new but still new to me) / ACI / NSX etc etc in order to become a better engineer !

I hope you enjoyed the blogpost and in the meantime, if you have some questions, you can leave a comment below.


Nicolas